Phantom 3 STANDARD antenna upgrade

happytreefriends: First of all, Stop being a dckhead and act like an adult.
If you can NOT properly respond in a public forum then just move on.

You got it, happytreefriends. You bite the hand that feeds you, you don't get fed any more.
No more donating in exchange for criticism. Outtahere..

If you were looking for pics, parts lists, instructions, and help... ask happytreefriends. He made me decide to pack it up and leave. I don't do this to be flamed.
 
Last edited:
Yep! I found 8" u.fl to RP-SMA pigtails on Amazon, a pair for around $5 shipped. I have ordered the ITE-DBS01 kit. I've already done the pigtail mod, have 3 RP-SMA jacks ready for any combination of antennas now.

Starting first by attaching INEXPENSIVE 2.4GHz and 5.8GHz omnidirectionals with 8 db gain (arriving today!) while waiting for my ITELITE DBS01 to arrive.

This is all very doable. The hard part is done. The ITELITE panel will go on with a bracket mod and a quick spin-on of the SMA connections.

View attachment 31502

OMG it would be great if you posted your step by step :)
 
happytreefriends: First of all, Stop being a dckhead and act like an adult.
If you can NOT properly respond in a public forum then just move on.

You got it, happytreefriends. You bite the hand that feeds you, you don't get fed any more.
No more donating in exchange for criticism. Outtahere..

If you were looking for pics, parts lists, instructions, and help... ask happytreefriends. He made me decide to pack it up and leave. I don't do this to be flamed.
 
Last edited:
happytreefriends: First of all, Stop being a dckhead and act like an adult.
If you can NOT properly respond in a public forum then just move on.

You got it, happytreefriends. You bite the hand that feeds you, you don't get fed any more.
No more donating in exchange for criticism. Outtahere..

If you were looking for pics, parts lists, instructions, and help... ask happytreefriends. He made me decide to pack it up and leave. I don't do this to be flamed.
 

Attachments

  • IMG_1373.JPG
    IMG_1373.JPG
    107.4 KB · Views: 687
Last edited:
Nate, I know you don't want to hear this, but most of the step by step is here and in dataa's pics.

You look at the YouTube vids of the P2VisionPlus upgrades to see the electric side of the work. It's just undoing 3 micro-coax connections and putting a UFL to RP-SMA pigtail on each of the empty jacks. The PS3 is actually EASIER than the P2V+ because it's all in one case and you don't have near as much disassembly.

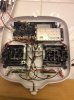
If you open your case, you can follow the black coax line from the antenna housing to the circuit board. It's right there by the shiny arrow embossed on top of the metal shield. Follow the wire.

Then see instructions about cleaning up the goop so you can lift the jack off the board at the connection. Use tweezers to lift UP and not fingers to wiggle and hog it out. It's all in the videos.

If you found the tx antenna coax connection on the circuit board, just look an inch up and there are the two FPV jacks on the piggyback board. They all line up in a row, but the FPV are on the piggyback board. Folllow the wires back to the panel antennas up front to be sure, one gray wire, one black wire. Then you exacto the goop off those and put the UFL end of the pigtails on those. Same as in the P2V, just working in an EASIER space where it's all in the controller case.

Be REAL careful and gentle when plugging in the 3 pigtails at the UFL end. Again, see the videos. Pay attention to the what, don't worry about where in the videos.

Once you've done all 3 pigtails, the one by the arrow runs to the 5.8 RP-SMA for the flight control antenna, the piggybacked pair run to the 2.4 RP-SMA for the FPV.

Unlimited jack exit locations. Choose what suits you. Drill slowly and CAREFULLY. You do this, it's on your own--you screw up, not my fault. :) If you want to exit the OEM tx antenna hole with RP-SMA, you will have to do trimming and relieving. If you can't do that, consider a different exit. Again, see the videos for suggested locations or what you need to do to relieve the antenna hole. (You need to get enough of the threaded section to stick out for antennae to screw onto).

I will post a few in process pics from last night.

Thank you so much, with this explanation and Dataa's pics etc... I should have everything I need. I really appreciate you taking the time to write and explain.
 
happytreefriends: First of all, Stop being a dckhead and act like an adult.
If you can NOT properly respond in a public forum then just move on.

You got it, happytreefriends. You bite the hand that feeds you, you don't get fed any more.
No more donating in exchange for criticism. Outtahere..

If you were looking for pics, parts lists, instructions, and help... ask happytreefriends. He made me decide to pack it up and leave. I don't do this to be flamed.
 
Last edited:
happytreefriends: First of all, Stop being a dckhead and act like an adult.
If you can NOT properly respond in a public forum then just move on.

You got it, happytreefriends. You bite the hand that feeds you, you don't get fed any more.
No more donating in exchange for criticism. Outtahere..

If you were looking for pics, parts lists, instructions, and help... ask happytreefriends. He made me decide to pack it up and leave. I don't do this to be flamed.
 

Attachments

  • IMG_1377.JPG
    IMG_1377.JPG
    59.2 KB · Views: 970
Last edited:
This image shows all three UFL to RP-SMA pigtails installed.

You can see the two 2.4GHz UFL connectors running to the RP-SMA on either side of the controller top. You can also see the 5.8GHz UFL connector by the heat shield arrow run to the RP-SMA connector that uses the OEM antenna port.

There is a lot of work not shown here, like the trim and relief work I did on the antenna port opening. Again... see the videos. Much better than writing. Or even better, think. Trust your own mind.

View attachment 31507


I used small dabs of clear low-temp glue gun glue to secure the 3 UFL connections, but NOT at the gold-plated connectors. Instead glue the line to a nearby shield or board to stabilize, keep the clean coax connector clean.

I used that dab of masking tape at bottom to temporarily hold the 5.8 tx line in place while the hot glue dried. You want to be REAL careful not to use any sharp bends or allow the pigtails to kink when you run them through the case.

You ROCK!!!!!
 
  • Like
Reactions: robiefield
happytreefriends: First of all, Stop being a dckhead and act like an adult.
If you can NOT properly respond in a public forum then just move on.

You got it, happytreefriends. You bite the hand that feeds you, you don't get fed any more.
No more donating in exchange for criticism. Outtahere..

If you were looking for pics, parts lists, instructions, and help... ask happytreefriends. He made me decide to pack it up and leave. I don't do this to be flamed.
 
Last edited:
  • Like
Reactions: dirkclod
happytreefriends: First of all, Stop being a dckhead and act like an adult.
If you can NOT properly respond in a public forum then just move on.

You got it, happytreefriends. You bite the hand that feeds you, you don't get fed any more.
No more donating in exchange for criticism. Outtahere..

If you were looking for pics, parts lists, instructions, and help... ask happytreefriends. He made me decide to pack it up and leave. I don't do this to be flamed.
 
Last edited:
I'm just passing the karma along.
You still have to do the work, and figure out the intermediate stuff not shown.
That's part of owning your work. Study hard, you will reward yourself.
I'm no smart guy, but I'm dogmatic and listen hard to the real smart people.


Nice job.

No matter how much I think I know about something listening to others, even if I already understand the subject, usually contains something I didn't know.
When someone asks me for help and mid-way say's "I know, I know," results in me being less forthcoming and reluctant to continue.
 
Lol got it. One more question. Where is the range extender on the P3S. Is it inside controller? Just started watching one of the videos.
The patch antennas from the wifi range extender are mounted vertically in the controller case just above the joystick controllers (if you are looking from bottom to top, most of my pics are upside down with the bottom at the top, and the top at the bottom.) They are the only circuit boards in the case with that orientation. You can follow the cables from the patch antennas down to the piggyback board with the twin UFL coax connectors.
 
Last edited:
happytreefriends: First of all, Stop being a dckhead and act like an adult.
If you can NOT properly respond in a public forum then just move on.

You got it, happytreefriends. You bite the hand that feeds you, you don't get fed any more.
No more donating in exchange for criticism. Outtahere..

If you were looking for pics, parts lists, instructions, and help... ask happytreefriends. He made me decide to pack it up and leave. I don't do this to be flamed.
 
Last edited:
  • Like
Reactions: dirkclod
happytreefriends: First of all, Stop being a dckhead and act like an adult.
If you can NOT properly respond in a public forum then just move on.

You got it, happytreefriends. You bite the hand that feeds you, you don't get fed any more.
No more donating in exchange for criticism. Outtahere..

If you were looking for pics, parts lists, instructions, and help... ask happytreefriends. He made me decide to pack it up and leave. I don't do this to be flamed.
 
Last edited:
Dirk,

Dataa mentioned he had to buy longer cables from Amazon, because the cables that came with the DBS01 mod are too short to be installed at the top of the controller, and you have to wait around 1 month because they come from China! Seems like no one in the USA has those? Did you already have extras or did you somehow make it stretch? That was my only concern....I"d rather have the connectors at the top of the controller.

Try eBay here : 2X U.FL Mini PCI to RP-SMA Pigtail Antenna WiFi Cable 6 Inches (15cm) USA
 
Robie,

You think 8" is enough to route it around the joystick mechanicals? I found 11" on Amazon for only a few $$ more.
 

Recent Posts

Members online

No members online now.

Forum statistics

Threads
143,096
Messages
1,467,615
Members
104,981
Latest member
brianklenhart