oukenfold said:
Highcloud
hi guys, where i can t someting like this for my tripod. to put the docooler repeter the baterie etc on the top of the tripod.?
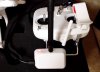
Rotating stand
http://cgi.ebay.co.uk/ws/eBayISAPI.dll? ... 587wt_1161
Follow the images and the repeater set up instructions. Remeber that you must use the SSID of Phantom_newname Took me 2 hours to figure out that Phantom_ is key to the ssid.
can you post that part of finding the phantom_newname highcloud plz,
thank all you guys i love my phantom everyday more and more.
Originally posts by Jason Lee and RemE
Report
RemE Tweaker
Corona Del Mar
Joined Sep 2005
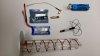
5,245 Posts How to configure a Long Range Extender
--------------------------------------------------------------------------------
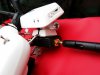
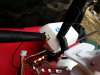
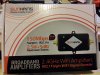
With many thanks to Mr. Lee and Mitchy123 for bringing light to this, here is my attempt of a how-to setup of the Docooler ARGtek 1500mW Router/Repeater/Client Bridge, available here;
http://www.amazon.com/gp/product/B00...?ie=UTF8&psc=1
First off, I love the stock WiFi Extender, it's small, runs a long time and is great for most general usage. I was drawn to the option of a larger extender that could be used as needed and not hack into the stock extender. This setup seems like the perfect option. Even if I don't go super far, I like the idea of the video and all the great telemetry data always being there, even if the control is lost. This way you can still monitor the model and get status as it hopefully goes into failsafe and begins its return.
This could be done with most any router, probably. I have a amateur license so I'm OK with using this more powerful version responsibly.
Overview, what we will do is to first gather the data from your existing Range Extender/Camera network. It will be needed to fill in the boxes in the Router config screens. Armed with that knowledge, we configure the router to mimic your stock extender.
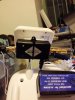
1 - Normally you start with a working Vision WiFi Range Extender setup, power up the extender, the Vision, then your Phone/Pad and go to Settings>WiFi, and connect to the Extender Network.
2 - While still in the phone/pad WiFi settings, touch the (i) info icon to the right of the currently connected Range Extender network. In this information page, jot down the "IP Address", "Router", and the "Search Domains" information.
3 - Now Open the DJI Phone App and go to Settings>General>Binding. In here you will see the "Current Binding" data. Copy down the SSID number, this is the hidden ID of the Vision Camera, note that it's "FC200_the last 6 digits of its MAC address", just good to know. Note - The other instructions I saw had you reset the Extender and then Re-Bind the Camera using the QR Code from the shipping box and the manual (pg16), this should not be necessary if you have a normally working system already as you should be able to just read the current data. I have tried it both ways and it does work to get the Camera's hidden SSID number to show up if that information is blank in this screen for some reason.
Now we will configure the router. But first, I thought I'd mention something about using a second, spare, Range Extender. I was going to get a 2nd extender to modify it with big antennas etc. as others have done. I took the 2nd extender and found that I could bind it to the same Vision using the QR code from the Vision Shipping box (I keep a copy of this QR code in my carry case). The 2nd Extender shows up as a 2nd network on the iPad. So you can carry a spare extender and use one OR the other with no changes needed on the Vision, just connect to the which ever extender you need, each has a unique network name, easy!
Now, back to the Router.
4 - Unpack it and connect its antennas, don't operate it without antennas!
5 - Power it up with its AC adapter, connect a LAN cable to your laptop's LAN port to port 1 of the Router (any port really, except the WAN port).
6 - Open your laptop's browser and type in this URL 192.168.1.254
This should open the router's built-in WLAN Access Point web interface.
7 - We will be only configuring a few items, navigate using the Site Contents bar on the left side of the screen beginning with "Operation Mode". We will NOT use the setup wizard.
8 - Click on "Operation Mode" on the left bar, now select the "Bridge" radio button. Then click on "Apply Change" button at the bottom. It may restart, but don't worry it will come back.
9 - Now click on "Wireless" on the left bar and below that, select "Basic Settings". In here you select "Client" for the mode. for SSID you type in the SSID information from your Vision camera. Check the box near the bottom "Enable Universal Repeater Mode". Lastly in the "SSID of Extended Interface" box type in the name you want this Router Network to show on your Phone/iPad. I chose "Phantom_Ranger" as mine. Now click on apply changes, it may restart, no worries.
NOTE- It appears that the Vision Phone App must see "Phantom" in the first part of the SSID name in order to accept the connection to the router. Be sure to enter Phantom(plus anything more here) when you choose your router's network name.
10- Now click on "TCP/IP Settings" on the left bar and select "LAN Interface".
IP Address, Enter the info from your phone's "Router" field.
DHCP Client Range, enter the IP address from your Range Extender's WiFi setting as the start range, and a higher address as the end range (doesn't really matter).
Domain Name, enter "lan", then apply changes.
This should be it! disconnect the laptop, I power cycled my router, then fired up my Vision TX, then the Vision (and camera/Wifi). Leave your range extender OFF. On my iPad I went into Settings, WiFi, and watched for the "Phantom_Ranger" network to show up. It did, I connected to it, then opened the Vision App, and it worked right off the bat!!