
Also I don't know if which wires are hooked up to what matters?Everything works as it should.


You are using an out of date browser. It may not display this or other websites correctly.
You should upgrade or use an alternative browser.
You should upgrade or use an alternative browser.
Improve of the distance of my Drone
- Thread starter riverphantom3
- Start date
Thanks would you mind if I ask you more questions as I'm doing the install?
No. I'm sure they are other guys much better than me at this on here. It's pretty straight forward from my pictures. Just be carful unplugging the wires from the cards.
Also I don't know if which wires are hooked up to what matters?
I posted a picture with yellow lines pointing to everything.
You left the wifi hooked up, you didn't have to unhook it to install the mod?I sent a picture with yellow lines pointing to everything.
You left the wifi hooked up, you didn't have to unhook it to install the mod?
You just have to connect the 3 wires in the picture to the area the yellow lines are draw too. That is it.
You don't have to unhook anything?You just have to connect the 3 wires in the picture to the area the yellow lines are draw to. That is it.
You don't have to unhook anything?
Yes that is what I am talking about.
But I want to fly further and with a better connection.I am not trying to be an ***@@@ . Just relax and have fun with it.. Trust me I spend over 20 thousand a year on rc toys.. Keep loosing it
- Joined
- May 19, 2015
- Messages
- 374
- Reaction score
- 139
- Age
- 64
Amazing what some people can achieve without trying..I am not trying to be an ***@@@ . Just relax and have fun with it.. Trust me I spend over 20 thousand a year on rc toys.. Keep loosing it
So I need the ITE-DBS01_v.1, will it come with everything I need to install it?
Sorry no, it won't include the additional IQ you'll need to complete the installation.
- Joined
- Nov 27, 2015
- Messages
- 388
- Reaction score
- 90
- Age
- 53
I highly recommend you pay someone to do this. The questions you're asking, you do not instill confidence as a person that knows what they're doing and this modification, you can easily mess up your transmitter. Even myself, with decent electronic and soldiering skills destroyed my Tx when attempting the mod. The problem is all that silicone on the wire connectors, and those little plastic connectors (especially the one on the battery). IMHO, if you have a ton of silicone crap securing the connectors on the wifi PCB, then i'd splice the wires as opposed to removing the silicone and trying to connect the the wires.I have a windsurfer but I'm not getting as far as I'd like, any modifications I can make without opening the controller?
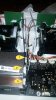
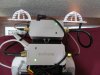
Look at the silicone on points 1 2 and 3. #1 was easy to remove, but not with 2 and 3. Somehow the gold connector got warp/cracked/bent when I removed the stock wire & silicone and the FPV kit's wire/connector would not fit.
Attachments
Last edited:
- Joined
- Oct 6, 2015
- Messages
- 4
- Reaction score
- 1
- Age
- 54
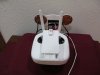
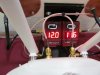
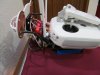
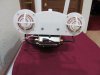
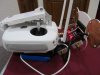
Wow, what a messed up thread. Here is what I know. Who is going to ever operate within line of sight? When I was flying RC planes you followed line of sight, you had to. There is just to much more you can do if you look a little further out with the quad. You know we all have or will. Even the police with their extremely hard to apply for COA's will be violating that rule. The object is, don't endanger others and don't fly beyond what the quad can do. Just use some common sense. I almost doubled the distance with my antenna mod. I don't work for them I am just saying, look at FPVLR out of Boca Raton, FL. It's way over priced, $300 with only one battery to power both amps. I bought another battery and added two volt meters for an additional $21 from a different supplier. I don't fly double the distance anymore, just the once on 100's of acres to test it out. I am going to snap several pics and upload them. I'm replying because I think I may have the answer for 123river1 phantom quad. And yes you have to open the controller up. It's easy, watch several you tube posts. Be safe and courteous.
Attachments

I have already purchases the mod and plan to modify it the day it comes in.I highly recommend you pay someone to do this. The questions you're asking, you do not instill confidence as a person that knows what they're doing and this modification, you can easily mess up your transmitter. Even myself, with decent electronic and soldiering skills destroyed my Tx when attempting the mod. The problem is all that silicone on the wire connectors, and those little plastic connectors (especially the one on the battery). IMHO, if you have a ton of silicone crap securing the connectors on the wifi PCB, then i'd splice the wires as opposed to removing the silicone and trying to connect the the wires.
Look at the silicone on points 1 2 and 3. #1 was easy to remove, but not with 2 and 3. Somehow the gold connector got warp/cracked/bent when I removed the stock wire & silicone and the FPV kit's wire/connector would not fit.
Yea I've already looked at this product but it was out of my price range.Wow, what a messed up thread. Here is what I know. Who is going to ever operate within line of sight? When I was flying RC planes you followed line of sight, you had to. There is just to much more you can do if you look a little further out with the quad. You know we all have or will. Even the police with their extremely hard to apply for COA's will be violating that rule. The object is, don't endanger others and don't fly beyond what the quad can do. Just use some common sense. I almost doubled the distance with my antenna mod. I don't work for them I am just saying, look at FPVLR out of Boca Raton, FL. It's way over priced, $300 with only one battery to power both amps. I bought another battery and added two volt meters for an additional $21 from a different supplier. I don't fly double the distance anymore, just the once on 100's of acres to test it out. I am going to snap several pics and upload them. I'm replying because I think I may have the answer for 123river1 phantom quad. And yes you have to open the controller up. It's easy, watch several you tube posts. Be safe and courteous.
- Joined
- May 19, 2015
- Messages
- 374
- Reaction score
- 139
- Age
- 64
- Joined
- Apr 2, 2014
- Messages
- 676
- Reaction score
- 123
Ok, I can't believe I just stumbled upon this thread.
Anyway, the parabolic reflector isn't such a bad idea, but I don't think the dish is tune to the 2.4 Ghz band.
123River1,
Here's an image of how parabolic reflector works:
File:Parabola with focus and arbitrary line.svg - Wikipedia, the free encyclopedia
It concentrates the signal it can gather over a larger area into a single point. And it re-broadcast the signals all out in same direction. I mean you would have to hold your controller pretty steady. I mean REAL steady.")
So you would need to place your antenna near or around where "F" is, not behind the dish. Another issue is that you would need to be able to move the dish as your drone moves. Now, assuming you are only going 1 direction, you can potentially aim the dish in that direction. However, this becomes difficult as you are moving in all three X, Y, and Z plain.
I've tried the ITE Mod on my P2V+ and it works GREAT! I was able to extend my range out to about 8000+feet.
If you want to go for the "LONG RANGE", I think you will want to ditch the P3 Standard and go for P3 Advanced or P3 Professional. I recently (black Friday) bought a P3 Professional, flown it a dozen time. It can go about 8000 feet from point of origin w/o even trying. That's because while P3 Standard uses analog signal, P3 Advanced and P3 Professional uses digital signal couple with FFT (fast Fourier transfer) that enables the drone to pick out a signal from all the noises. In fact, you can pick out a signal that's much weaker then background noise That is how P3 Professional and P3 Advance able to go such a far distance.
Now with its superior signal processing capability, all you need to do is boost the signal a little bit (perhaps with an amplifier?) and you can pretty much go out of the range of what your battery is capable (assuming the return trip is important too).
A Note on the ITE mod. Simple physics is that you don't get something for nothing. The "mod" simply focuses all the transmission in a general direction. It takes the signal that's broadcasting somewhere else toward where you need it. This is great if you know where your drone is and you point in that direction. In concept it's great, in practice, when your drone is "out there" and out of sight, it is a little bit difficult to "aim right". People do get good at "aiming" at "nothing" after a while. This is generally called "directional antenna".
I see that you've already bought the P3 Standard ITE Kit (hope you got the right one: ITE-DBS01_V.1), so perhaps you can take this time to look over the instructions on how to install it and use it.
Phantom 3 Standard solution | DBS Mods
In a nutshell, you are basically replacing the antenna. So open the case and see where your original antenna goes, and that's where you want to replace with the ITE-DBS01 antenna. Here's a slight twist: The whole antenna setup from "DJI" are internalized. That means you have no access to any of it until you open up the controller. The "ITE-DBS01" mod, brings the antenna connection to OUTSIDE of the controller. This allows you to hook up any other antenna you choose. The "connectors" for antennas are fairly standard if not a bit confusing. So inside the controller, you are essentially installing an "extension cord" to bring the antenna connector to outside of the controller. Then outside of the controller is where you connect your antenna going forward.
So while this video below is for "Phantom Vision 2 +", I think watching this a few times would help. The exact specifics are different, but the general concepts are the same. Post #110 from "GaDrone", first pictures will show you the three connection points that you want to install the "extension cord" to bring it outside of the controller. This is exactly the same thing that's done for Phantom Vision 2+, so looking at the video below will help you understand:
Anyway, the parabolic reflector isn't such a bad idea, but I don't think the dish is tune to the 2.4 Ghz band.
123River1,
Here's an image of how parabolic reflector works:
File:Parabola with focus and arbitrary line.svg - Wikipedia, the free encyclopedia
It concentrates the signal it can gather over a larger area into a single point. And it re-broadcast the signals all out in same direction. I mean you would have to hold your controller pretty steady. I mean REAL steady.
So you would need to place your antenna near or around where "F" is, not behind the dish. Another issue is that you would need to be able to move the dish as your drone moves. Now, assuming you are only going 1 direction, you can potentially aim the dish in that direction. However, this becomes difficult as you are moving in all three X, Y, and Z plain.
I've tried the ITE Mod on my P2V+ and it works GREAT! I was able to extend my range out to about 8000+feet.
If you want to go for the "LONG RANGE", I think you will want to ditch the P3 Standard and go for P3 Advanced or P3 Professional. I recently (black Friday) bought a P3 Professional, flown it a dozen time. It can go about 8000 feet from point of origin w/o even trying. That's because while P3 Standard uses analog signal, P3 Advanced and P3 Professional uses digital signal couple with FFT (fast Fourier transfer) that enables the drone to pick out a signal from all the noises. In fact, you can pick out a signal that's much weaker then background noise That is how P3 Professional and P3 Advance able to go such a far distance.
Now with its superior signal processing capability, all you need to do is boost the signal a little bit (perhaps with an amplifier?) and you can pretty much go out of the range of what your battery is capable (assuming the return trip is important too).
A Note on the ITE mod. Simple physics is that you don't get something for nothing. The "mod" simply focuses all the transmission in a general direction. It takes the signal that's broadcasting somewhere else toward where you need it. This is great if you know where your drone is and you point in that direction. In concept it's great, in practice, when your drone is "out there" and out of sight, it is a little bit difficult to "aim right". People do get good at "aiming" at "nothing" after a while. This is generally called "directional antenna".
I see that you've already bought the P3 Standard ITE Kit (hope you got the right one: ITE-DBS01_V.1), so perhaps you can take this time to look over the instructions on how to install it and use it.
Phantom 3 Standard solution | DBS Mods
In a nutshell, you are basically replacing the antenna. So open the case and see where your original antenna goes, and that's where you want to replace with the ITE-DBS01 antenna. Here's a slight twist: The whole antenna setup from "DJI" are internalized. That means you have no access to any of it until you open up the controller. The "ITE-DBS01" mod, brings the antenna connection to OUTSIDE of the controller. This allows you to hook up any other antenna you choose. The "connectors" for antennas are fairly standard if not a bit confusing. So inside the controller, you are essentially installing an "extension cord" to bring the antenna connector to outside of the controller. Then outside of the controller is where you connect your antenna going forward.
So while this video below is for "Phantom Vision 2 +", I think watching this a few times would help. The exact specifics are different, but the general concepts are the same. Post #110 from "GaDrone", first pictures will show you the three connection points that you want to install the "extension cord" to bring it outside of the controller. This is exactly the same thing that's done for Phantom Vision 2+, so looking at the video below will help you understand:
- Joined
- Apr 2, 2014
- Messages
- 676
- Reaction score
- 123
OK. Hands up who didn't see that coming.
Didn't look too bad. Seems like just dampner came lose.
Similar threads
- Replies
- 4
- Views
- 1K
- Replies
- 1
- Views
- 2K
- Replies
- 3
- Views
- 2K
- Replies
- 14
- Views
- 1K


