More powerfull repeater?

Tested various antennas this weekend. The following are not scientific results. Just my amateurish observations.

Added Cloverleaf to RC TX using RP-SMA Pigtail Antenna WiFi Cable. Resulting range on clear day was 1.2 to 1.3 miles. Was able to determine distance using video and navigation software for accurate distance. Never tested the stock antenna so can' t offer a comparison. I am curious however as to what stock antenna offers.

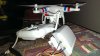
With regard to 2.4 repeater. Bought a second repeater and was able to bind it easily. Both repeaters now work without issue. Added U.FL Mini PCI to RP-SMA Pigtail Antenna WiFi Cable as discussed in this thread so antennas could be changed easily.

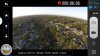
With an omnidirectional antenna (TP-LINK TL-ANT2405CL 2.4GHz 5dBi), FVP range was 800 to 1,000 feet. Not too impressive and very similar to stock repeater. I've been able to get 1,000 feet with the stock setup. Very convenient and portable, but don't see the point. Might be useful if you fly behind, or to the side, of your forward facing position.

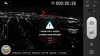
With TP-LINK TL-ANT2409A 2.4GHz 9dBi Directional Antenna, range was 2,700 to 2,950 feet. Also convenient and portable. The antenna can be easily mounted on RC, or in my case, simply used Velcro to attach underneath the repeater. You must face the PV2.

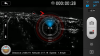
With TP-LINK TL-ANT2414A 2.4GHz 14dBi, range was 3,000 feet. Not convenient. Requires a tripod or other mount. It also seemed that this larger direction antenna was much more sensitive to directional pointing. Almost to the point of being a nuisance to direct towards the PV2. For me, not worth the hassle when compared to the 9dBi Directional Antenna.

At this point, RC range is almost double FVP range.

I'm waiting for the Docooler repeater and wonder as to what the range will be using its stock Omni directional antennas, and alternatively, with different the Omni and directional antennas that I've tried on the stock P2V repeater.

I still suspect that the best and most portable FVP option will be to add the RX cloverleaf to the camera. Doesn't seem mechanically complicated, but I don't understand the logistics. The camera has 2 pigtail attachments, just like the repeater; and both wires run down the P2V legs. Is one for the for the 5.8 RC and the other for the 2.4 repeater? Are they both for the repeater (as with he repeater itself) with the 5.8 RX antenna located elsewhere? Does anyone know where to conveniently buy TX and RX matching 2.4ghz circular polarized antenna's?
 
I know nothing of your fantastic technical achievements, but I do know the wires down the legs are antennas from the 5.8GHz receiver. The antennas for the 2.4GHz wifi link are mounted inside the camera unit, one on each side...

(Unless I've been having a monumental misunderstanding of the unit internals! :shock: )
 
i have opend the camera and put pigtails on it that was a little nervracking :roll: but i got it. I have also opend the phantom and tryed taking the antannas of of it to attach some pig tails DO NOT DO THIS !!!!! :cry: The ones on the camera are free what i mean by this is there is no glue or anything holding them. The phantom is a totaly differnt set up what they did is what it looks like is JB weld on the connectors its vary hard to see but it is there and if you try to take there antannas off you will rip them off the circuit board what im going to do when i get my new 5.8 ghz Circit board witch is a 30$ part so not to bad.... is strip them back and attach my pigtails to them and solder them together. so every pigtail you can put on this thing i have messed with lol. if any one wants pics of the camera taken apart i will post . MY MISTAKES ARE YOUR GAIN :?
 
Guys I need your help. I disconnected my antenna to replace it with http://www.amazon.com/gp/product/B00HM0 ... 9KAYIQOOLR

There was alot of white silicone around the pigtail connector and I tried to get as much of it from around the connector. However I am not able to get the connector from my new antenna to fit securely into the connector. What's my alternative? Can this be soldered? I have no experience with this but I can take my Tx to my local hobby shop and get someone to do this. Please advise!

Thanks!
 
A few pages back I mentioned that the stock repeater seemed to perform better when it was at top of charge. While waiting for my docooler repeater to arrive I have done some work on getting the most out of the stock repeater with the stock antenna. The repeater charges quite slowly at around 70 mA but uses around 330 mA when in wfi operation. Keeping the internal 3.7v battery at its maximum charge seemed to improve the range, so I added a 5 v battery pack to the micro USB input of the repeater. This now ensures that the repeater battery is always at top of charge and the resultant flight distances suggest that this is an improvement. I flew 675 Metres using this set up - see image. The battery pack that I went with is a 5 v 12000 mAh pack with USB output that links nicely into the repeater.

What 5V charger did you use?
 
BAKER_1111 said:
i have opend the camera and put pigtails on it that was a little nervracking :roll: but i got it. I have also opend the phantom and tryed taking the antannas of of it to attach some pig tails DO NOT DO THIS !!!!! :cry: The ones on the camera are free what i mean by this is there is no glue or anything holding them. The phantom is a totaly differnt set up what they did is what it looks like is JB weld on the connectors its vary hard to see but it is there and if you try to take there antannas off you will rip them off the circuit board what im going to do when i get my new 5.8 ghz Circit board witch is a 30$ part so not to bad.... is strip them back and attach my pigtails to them and solder them together. so every pigtail you can put on this thing i have messed with lol. if any one wants pics of the camera taken apart i will post . MY MISTAKES ARE YOUR GAIN :?

I did same. Opened the camera and added pigtail. the antenna leads have two IPX connectors on either end. One end connects to the wifi transmitter board and other end connects to antennas on either side of the camera. Originally, planned to make cable which has IPX female? (connector normally on pcb) so that I could attach to the lead rather than to wifi tx board itself but in process I managed to kink the lead really bad and damaged it. So second time I attached directly to board and wasn't as tricky as I thought. you don't have to completely take the camera apart. You can just take off silver ring and use a screwdriver to gently pry the board up enough to pop off ipx connector and attach new lead. A little hard to explain without a picture so I hope all that made sense. I agree though its nerve racking messing with such an expensive piece of equipment. all the screws are really tight and strip easily so you have to be very careful but it can be done.
 
Wow I am very impressed! I build surveillance systems for law enforcement, private investigators, hunters and other type needs. A lot of those applications were custom wireless camera- long range needs. After reading 50 percent of this large section of posts for extending the range the f 2 v, there are some very sophisticated folks that belong to this group IMHO! I am very thankful for a positive thinktank of sorts!
Thanks guys!
Moose
 
semaj said:
A few pages back I mentioned that the stock repeater seemed to perform better when it was at top of charge. While waiting for my docooler repeater to arrive I have done some work on getting the most out of the stock repeater with the stock antenna. The repeater charges quite slowly at around 70 mA but uses around 330 mA when in wfi operation. Keeping the internal 3.7v battery at its maximum charge seemed to improve the range, so I added a 5 v battery pack to the micro USB input of the repeater. This now ensures that the repeater battery is always at top of charge and the resultant flight distances suggest that this is an improvement. I flew 675 Metres using this set up - see image. The battery pack that I went with is a 5 v 12000 mAh pack with USB output that links nicely into the repeater.

What 5V charger did you use?

I had a sample from china in my office that I used but it is a common part. Check on ebay for USB battery pack then choose how many mA you prefer. 12000 is a good size in my opinion it's 6 Times bigger than the repeater battery.
 
BAKER_1111 said:
I have also opend the phantom and tryed taking the antannas of of it to attach some pig tails DO NOT DO THIS !!!!! :cry: The ones on the camera are free what i mean by this is there is no glue or anything holding them. The phantom is a totaly differnt set up what they did is what it looks like is JB weld on the connectors
I have planed of doing this today!

I'm going to open the P2V up (again)

If I think that it can be done I will think of you, take a deep breath, say my prayers and have a go at it.
If I think that it can not be done I will say "Thank you BALER_1111", and leave it as it is (for now)

Will report back.
 
helixaviator said:
BAKER_1111 said:
i have opend the camera and put pigtails on it that was a little nervracking :roll: but i got it. I have also opend the phantom and tryed taking the antannas of of it to attach some pig tails DO NOT DO THIS !!!!! :cry: The ones on the camera are free what i mean by this is there is no glue or anything holding them. The phantom is a totaly differnt set up what they did is what it looks like is JB weld on the connectors its vary hard to see but it is there and if you try to take there antannas off you will rip them off the circuit board what im going to do when i get my new 5.8 ghz Circit board witch is a 30$ part so not to bad.... is strip them back and attach my pigtails to them and solder them together. so every pigtail you can put on this thing i have messed with lol. if any one wants pics of the camera taken apart i will post . MY MISTAKES ARE YOUR GAIN :?

I did same. Opened the camera and added pigtail. the antenna leads have two IPX connectors on either end. One end connects to the wifi transmitter board and other end connects to antennas on either side of the camera. Originally, planned to make cable which has IPX female? (connector normally on pcb) so that I could attach to the lead rather than to wifi tx board itself but in process I managed to kink the lead really bad and damaged it. So second time I attached directly to board and wasn't as tricky as I thought. you don't have to completely take the camera apart. You can just take off silver ring and use a screwdriver to gently pry the board up enough to pop off ipx connector and attach new lead. A little hard to explain without a picture so I hope all that made sense. I agree though its nerve racking messing with such an expensive piece of equipment. all the screws are really tight and strip easily so you have to be very careful but it can be done.

What did you do with the new pigtail? Did you connect an RX antenna?
 
mem_ny said:
helixaviator said:
BAKER_1111 said:
i have opend the camera and put pigtails on it that was a little nervracking :roll: but i got it. I have also opend the phantom and tryed taking the antannas of of it to attach some pig tails DO NOT DO THIS !!!!! :cry: The ones on the camera are free what i mean by this is there is no glue or anything holding them. The phantom is a totaly differnt set up what they did is what it looks like is JB weld on the connectors its vary hard to see but it is there and if you try to take there antannas off you will rip them off the circuit board what im going to do when i get my new 5.8 ghz Circit board witch is a 30$ part so not to bad.... is strip them back and attach my pigtails to them and solder them together. so every pigtail you can put on this thing i have messed with lol. if any one wants pics of the camera taken apart i will post . MY MISTAKES ARE YOUR GAIN :?

I did same. Opened the camera and added pigtail. the antenna leads have two IPX connectors on either end. One end connects to the wifi transmitter board and other end connects to antennas on either side of the camera. Originally, planned to make cable which has IPX female? (connector normally on pcb) so that I could attach to the lead rather than to wifi tx board itself but in process I managed to kink the lead really bad and damaged it. So second time I attached directly to board and wasn't as tricky as I thought. you don't have to completely take the camera apart. You can just take off silver ring and use a screwdriver to gently pry the board up enough to pop off ipx connector and attach new lead. A little hard to explain without a picture so I hope all that made sense. I agree though its nerve racking messing with such an expensive piece of equipment. all the screws are really tight and strip easily so you have to be very careful but it can be done.

What did you do with the new pigtail? Did you connect an RX antenna?

Yes but have not tested yet.....
 
Yea I'm still waiting on a part and some antennas and some boosters I'm not necessarily trying to go for distance I'm trying to go for reliability so I can fly in town or anything and it'll still keep connection but also some distance :D
 
Hi Guys,

Firstly thanks for all the work to research and display your solutions. Based on this topic I upgraded my unit using:

1. UFL to SMA Male pigtails
2. 2.5 mm drill bit
3. Hook and loop stick on Velcro
4. Huber and Suhner 8.5dbi MiMo antenna

First test easily went 500m. This has really added another degree of enjoyment.
 

Attachments

  • IMAG0086-2.jpg
    IMAG0086-2.jpg
    356.6 KB · Views: 1,562
Simon Manners said:
Hi Guys,

Firstly thanks for all the work to research and display your solutions. Based on this topic I upgraded my unit using:

1. UFL to SMA Male pigtails
2. 2.5 mm drill bit
3. Hook and loop stick on Velcro
4. Huber and Suhner 8.5dbi MiMo antenna

First test easily went 500m. This has really added another degree of enjoyment.

Clean looking setup but the antenna setup on the phantom is a diversity not a mimo setup. I've also done better than 500m range using a single 5dbi omni directional.
 
I've currently done test flights on three different TPLink antennas, the 5dbi and 8dbi Omni Directional and the 9dbi directional. The results using both the omni directional antennas have been nothing less than outstanding with the 5dbi pushing just over 2,000 foot range and the 8dbi pushing 2,533 foot range on my last test.

The 9dbi directional on the other hand has proven very disappointing on the three flights I've done with it with a max range around 1,100 feet which is not much better than my stock setup of just over 1,000 foot range. Apparently a couple of the users here have pushed over 2,000 feet with it, so maybe the mounting position is the cause. I had it mounted on top of the repeater by two rubber bands. I'll try again with it mounted separately in case there is any interference with it being on top.

Below is a screen cap of a flight using my 8dbi TPLink omni directional. The transmission was pretty reliable till around 2,400 feet and over 300 foot altitude and completely cut out when it passed 2,533 feet. Also believe it or not I was flying within Visual Line Of Sight. Gotta love night flying, The Phantoms Red and Green lights are like a beacon in the night sky. Also is a picture of my controller with the 8dbi antenna screwed on and the orientation I was using it in. Along with the 5dbi omni above it for size reference.

On a side note I also have a 9dbi omni directional antenna from another company I will be testing next. Also I think the omni directional antenna setup is the better route to go than the directional antennas for every day use. They're much more light weight and compact and give substantial gains over stock.
 

Attachments

  • 2533 feet phantom.PNG
    2533 feet phantom.PNG
    519.8 KB · Views: 483
  • 2458 Phantom.PNG
    2458 Phantom.PNG
    551.1 KB · Views: 422
  • 8 and 5 dbi tplink Phantom.JPG
    8 and 5 dbi tplink Phantom.JPG
    521.3 KB · Views: 447
BenDronePilot said:
I've currently done test flights on three different TPLink antennas, the 5dbi and 8dbi Omni Directional and the 9dbi directional. The results using both the omni directional antennas have been nothing less than outstanding with the 5dbi pushing just over 2,000 foot range and the 8dbi pushing 2,533 foot range on my last test.

The 9dbi directional on the other hand has proven very disappointing on the three flights I've done with it with a max range around 1,100 feet which is not much better than my stock setup of just over 1,000 foot range. Apparently a couple of the users here have pushed over 2,000 feet with it, so maybe the mounting position is the cause. I had it mounted on top of the repeater by two rubber bands. I'll try again with it mounted separately in case there is any interference with it being on top.

Below is a screen cap of a flight using my 8dbi TPLink omni directional. The transmission was pretty reliable till around 2,400 feet and over 300 foot altitude and completely cut out when it passed 2,533 feet. Also believe it or not I was flying within Visual Line Of Sight. Gotta love night flying, The Phantoms Red and Green lights are like a beacon in the night sky. Also is a picture of my controller with the 8dbi antenna screwed on and the orientation I was using it in. Along with the 5dbi omni above it for size reference.

On a side note I also have a 9dbi omni directional antenna from another company I will be testing next. Also I think the omni directional antenna setup is the better route to go than the directional antennas for every day use. They're much more light weight and compact and give substantial gains over stock.

I'm definitely interested in which specific antennas you purchased because I would like to do that mod. Also a how to video would help so I know I'm soldiering into the right connectors. :)
 
I've been too busy lately to continue my testing. Plus, this forum spent a little time in the dumper (as someone put it, it was like the wild west with no moderator.)

BenDronePilot - Which type of diversity is being used (Ex: Switching, Selecting, Combining, Dynamic Control)? I've not been able to prove one way or another. Also, while I agree with you, how do you know for sure that MIMO is not being used? The perplexing thing to me about the repeater is that if it were a simple diversity setup (Ex: Switching) then I'm confused on the setup. 1) They are using two 1/4 wave antennas right next to each other. I don't see how it would really matter which one was being used, basically they will be receiving the same signal. 2) For the simple diversity setup to have real effect, the two antennas need to be separated by one full wavelength (4.92 inches.) If they are using combining or a more sophisticated system like MIMO, replacing only one of the antennas would defeat the potential value of the system (would still work, just not as well as intended.)

There must be something wrong with your testing (or your patch antenna) everything else being equal, it does not make sense that a 5dbi omni would out perform a 9dbi directional. The only thing I can think of is that you are somehow flying outside the beamwidth of the 9dbi directional or you have it mounted horizontal rather than vertically (90deg out of phase). Which brings me to my final observation. In your picture you have your onmi antenna horizontal rather than vertical. Is this the way you are using it? If so, and if you are getting that range, something is very strange (like maybe the antennas in the camera somehow were installed 90deg out of phase), in which case try rotating the directional antenna too.

BTW, I see in your screen shots that you are flying sideways, when does the signal cut out if pointed away from you? My guess is 1500 to 1800 feet?

This is with a 12dbi patch (flying sideways after 1800 feet to keep solid video). It actually went further, but no point in showing a screen shot as the distance changes to "N/A" after 3299 feet.:


BTW, your doing great, it's really good to see testing with omni's. Thank you.
 

Attachments

  • Screenshots_2014-01-19-17-08-31.jpg
    Screenshots_2014-01-19-17-08-31.jpg
    69.9 KB · Views: 494
Scottrod said:
I'm definitely interested in which specific antennas you purchased because I would like to do that mod. Also a how to video would help so I know I'm soldiering into the right connectors. :)

Here's the video how to you asked for. And all of the antenna model numbers used in this mod are listed in the description. This may make you happy but no soldering is required, Just a little drilling to make a whole in the side of the repeater.

https://www.youtube.com/watch?v=aEHzDi4hHKU
 
BenDronePilot said:
Scottrod said:
I'm definitely interested in which specific antennas you purchased because I would like to do that mod. Also a how to video would help so I know I'm soldiering into the right connectors. :)

Here's the video how to you asked for. And all of the antenna model numbers used in this mod are listed in the description. This may make you happy but no soldering is required, Just a little drilling to make a whole in the side of the repeater.

https://www.youtube.com/watch?v=aEHzDi4hHKU

Thanks Ben!
 

Members online

No members online now.

Forum statistics

Threads
143,097
Messages
1,467,626
Members
104,983
Latest member
nicos18