Did you upgrade?

Yes, this thing needs to go on a serious diet. Tommorow I am going to locate everything inside so the only thing below is the Tx and the Zenmuse. Not sure where I am going to put everything but I am tired of looking at the mess beneath. It would be nice of there was way to get rid of the CAN BUS cable on the iosd. I have seen the solder method to the board in the iosd but it appears to be additional components on the CAN BUS connector.

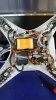
Well If going to put the iOSD inside the shell on the P2 using the AVL58 TX then you'll have to hard wire it as you will no longer need the HUB. Here is how and where I mounted the iOSD module as there's plenty of room for it next to the Naza module
IMG_1551.jpg


Here is an old photo of the AVL58
IMG_4641.jpg
 
That was fun. If you were to rotate your iosd clockwise 90 degrees, the FPV board fits right next to it. I then stuck the CAN connector on the lower shell right above the USB mini port.
 
That was fun. If you were to rotate your iosd clockwise 90 degrees, the FPV board fits right next to it. I then stuck the CAN connector on the lower shell right above the USB mini port.

I have seen it done that way which I never considered to be a good nor solid location for mounting anything. With all that open space right next to the naza module which makes for an ideal and solid mounting area. So what did you do with the poor excuse for a plug n play (HUB) or did hard wire it all up??
 
I mounted the hub, video interference board and iosd mini on the main board. I cut the supplied AVL 58 cable with the battery connector and soldered on a four pin vtx cable. Pretty impressed with the clover leafs that come with it. The only thing on the outside is the TX and gimbal.
 
Finally able to upload a picture of everything inside....
 

Attachments

  • 20160518_161941.jpg
    20160518_161941.jpg
    2.4 MB · Views: 294

Recent Posts

Members online

Forum statistics

Threads
143,099
Messages
1,467,633
Members
104,985
Latest member
DonT