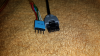
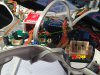
The new Phantom Upgrade Kit for Zenmuse H3-2D board (board part #P330CB-H3-2D V3) has a 4-pin connector to connect to a iOSD Mini. Soldering is still required, but there is a weight saving a cleaner install.
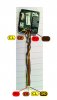
If you had the Phantom positioned so you are looking at the backside the 4-pin male connector is just to right of the USB cord on the rear of the board. The pin order from left to right is: RV(regulated volt), CH(CAN High), CL(CAN Low, and GND(Ground). I used the 4-pin female that came with the iOSD Mini Kit which works perfect.
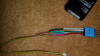
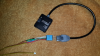
I then opened up the iOSD Mini case and removed CAN Bus wire from the bottom of the Mini. A word of warning there is some protective gum you have to chip away to get to where you can to the solder joints to desolder all 4 wires. That wiring order is from left to right: CL, CH, RV, and GND. Then I soldered the 4 wire ribbon with female connector to the Mini.
I did not discover this connector I found it on this thread. http://www.phantompilots.com/viewtopic.php?f=5&t=21748
Thank you, nudeymagazineday
;
If you had the Phantom positioned so you are looking at the backside the 4-pin male connector is just to right of the USB cord on the rear of the board. The pin order from left to right is: RV(regulated volt), CH(CAN High), CL(CAN Low, and GND(Ground). I used the 4-pin female that came with the iOSD Mini Kit which works perfect.
I then opened up the iOSD Mini case and removed CAN Bus wire from the bottom of the Mini. A word of warning there is some protective gum you have to chip away to get to where you can to the solder joints to desolder all 4 wires. That wiring order is from left to right: CL, CH, RV, and GND. Then I soldered the 4 wire ribbon with female connector to the Mini.
I did not discover this connector I found it on this thread. http://www.phantompilots.com/viewtopic.php?f=5&t=21748
Thank you, nudeymagazineday
;
")