I would like to add my comment on this thread to confirm that I had to do the same thing for my brand new P3P. Initially I tested only the 4K video which looked okay but difficult to gauge due to the crappy compression. Yesterday I flew a test flight for photos and discovered to my horror that the images were pretty soft on the whole right side. After a typically frustrating chat with DJI support ("What firmware are you using?" sort of questions.) They agreed to repair it with a 3-4 week round trip!
Well I just can't do that as I have a commitment in two weeks. So I watched the lens change video above, and discovered that it is pretty easy to fiddle with the sensor mount to adjust the focus.
Here's some more info to help anyone who thinks they need to do this.
1) You con't need to take anything apart except the back panel, and that can be done (very carefully!) with the drone intact, which is really helpful in testing.
2) You will need a T-6 Torx driver, preferably one with a relatively long shaft. And also a very small philips screwdriver, I used a PH000 but a PH00 or PH0 is probably better.
3) Take the back panel off in a very clean location so you don't lose the screws. They are fixed in with blue Loctite but mine came out pretty easily. You can leave the back panel off with the screws in a safe place like a dish.
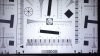
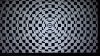
4) I took mine outside, barely loosened the four circuit board mount screws (like one full turn each) and turned everything on, set the drone on a table, and took a test shot of my backyard with lots of details to see focus. I previewed it full size on my iPad to see how bad each area was.
5) Very carefully, thinking in opposites (left is right, up is down) I tightened the screws a very small amount and took test shots until each corner was in focus. I turned the drone off and removed the battery in between shots just to be sure there was no power in the system to arc circuit the board if I touched anything. I guess technically this should be done with anti static protection but I wasn't concerned about static here with decent humidity.
6) Tightening the screws moves the focus away from the camera (farther away), loosening them moves the focus closer to the camera. That's just optics.
7) Even after adjusting everything, I find that one corner is still not perfectly in plane and the focus distance is slightly but not critically far. Most images and video will be farther than a few meters and it gets to be a little soft in that corner at +/- two meters and closer. The movements really are microscopic, and that corner was already loose and would not move any farther from the lens without additional disassembly. I suppose I could add a micro shim to it but I didn't want to take it all apart and really give myself a headache or even risk hosing the whole thing.
8) The whole process took me about two hours of fiddling very carefully. If I had to do it again it might only take 30 minutes in a pinch, but I would still want to go slowly and methodically anyway. The movements are so tiny as to be invisible, it's just variable tightness of the screws over maybe a half to full turn range. Barely a fraction of a millimeter of total sensor movement.
In any case, my takeaway from this is that DJI considers this to be an acceptable manufacturing method for all of their drones, saving about a dollar per unit and creating a pretty consistent failure rate from what I can tell reading online. They probably consider it cheaper to replace the camera occasionally when someone gets a bad one and actually complains. It really is a piss-poor way to put things together, but options are pretty thin for this kind of tool, so for now I'll have to consider it a normal business risk.
Given the need, the camera could probably be rebuilt by someone with careful methodology and a clean environment to get the sharpest possible image.
The video above is really helpful in seeing the insides of the unit. Again, I discovered that adjusting the sensor distance only requires removal of the back panel, and leaving everything on the drone makes it easier to shoot/preview/adjust as needed. Just be extremely careful as you handle the gimbal and camera, and try to be as clean as possible.