- Joined
- Mar 8, 2014
- Messages
- 193
- Reaction score
- 3
You can install a Walkera G2D Gimbal onto a phantom FC40 or Phantom 1 without soldering or splicing any wires or cables. You can do it by opening the phantom up and simply plugging some things in.
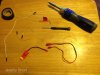
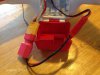
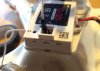
Besides the gimbal, this is everything you need.
-Parts
An XT60 adapter with a two pin JST
JST Extension
Breadboard cable - female to female, I used a male to female extension because mine wasn't long enough. Most of the time you find these as a ribbon cable, where you just peel off the ones you need.
-Tools
5/64 Hex wrench (Allen Wrench), I believe this is the equivalent of a #2 metric. You want to have one with a good handle. These screws are easy to strip, especially the first time you take them out. You will need one with a long skinny head that will fit into a deep spot for four of the screws. I used the fancy screwdriver for all but these four, and used the basic allen for the those.
-A very tiny phillips head screwdriver. I'm not sure what size this is, but with the set of tiny screwdrivers, it was the smallest I had. Not eye glasses small, but very small.
-Electrical tape, just to make sure stuff doesn't come unplugged.
Here we go
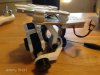
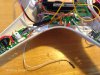
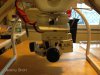
If you compare your gimbal to this one, you'll see that the top plate has been spun around 180 degrees. This needs to be done so that the gimbal will sit underneath properly, if you don't do this it will sit under the battery door and you won't be able to open it. Just pop the rubber bubbles out of it, flip it around and pop them back in. This takes a little bit of time. You shouldn't ever have to do this again.
You can look at the plastic mount (it came with your gimbal) and see which way it needs to be oriented. Screw it onto the bottom of the phantom. The gimbal should slide on and off of the mount, but not so easy that it comes loose.
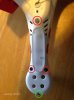
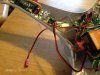
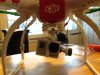
A this point remove the legs (the legs block a screw), and the prop guards if you have them (there is a screw that needs to be removed thats under the prop guard). Take notice of the compass cable.
Be very careful to pull just on the white head, not the off white part above it, and not on the gray cable. This head can pull off very easily, and you don't want to mess it up.
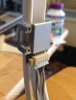
These are the screws you must remove. You need to do this on each of the four arms. The red circles are the hex/allen screws, the green one the tiny phillips. You do not need to remove the motor screws (if you have prop guards you already took the two out to get the guards off, the other two can stay). These screws are a different length than the leg screws, so take notice which are which.
-More in the next comment
Besides the gimbal, this is everything you need.
-Parts
An XT60 adapter with a two pin JST
JST Extension
Breadboard cable - female to female, I used a male to female extension because mine wasn't long enough. Most of the time you find these as a ribbon cable, where you just peel off the ones you need.
-Tools
5/64 Hex wrench (Allen Wrench), I believe this is the equivalent of a #2 metric. You want to have one with a good handle. These screws are easy to strip, especially the first time you take them out. You will need one with a long skinny head that will fit into a deep spot for four of the screws. I used the fancy screwdriver for all but these four, and used the basic allen for the those.
-A very tiny phillips head screwdriver. I'm not sure what size this is, but with the set of tiny screwdrivers, it was the smallest I had. Not eye glasses small, but very small.
-Electrical tape, just to make sure stuff doesn't come unplugged.
Here we go
If you compare your gimbal to this one, you'll see that the top plate has been spun around 180 degrees. This needs to be done so that the gimbal will sit underneath properly, if you don't do this it will sit under the battery door and you won't be able to open it. Just pop the rubber bubbles out of it, flip it around and pop them back in. This takes a little bit of time. You shouldn't ever have to do this again.
You can look at the plastic mount (it came with your gimbal) and see which way it needs to be oriented. Screw it onto the bottom of the phantom. The gimbal should slide on and off of the mount, but not so easy that it comes loose.
A this point remove the legs (the legs block a screw), and the prop guards if you have them (there is a screw that needs to be removed thats under the prop guard). Take notice of the compass cable.
Be very careful to pull just on the white head, not the off white part above it, and not on the gray cable. This head can pull off very easily, and you don't want to mess it up.
These are the screws you must remove. You need to do this on each of the four arms. The red circles are the hex/allen screws, the green one the tiny phillips. You do not need to remove the motor screws (if you have prop guards you already took the two out to get the guards off, the other two can stay). These screws are a different length than the leg screws, so take notice which are which.
-More in the next comment