Video: Fitted my Phantom v1 into a Phantom 2 shell (easy!)

Success... within reach?

I did just as you suggesed, PJA, and that dim bulb in my brain suddenly flashed brightly as I realized Dewey's battery door was facing away from him. I keep telling myself, "the back is the new front" but it takes time to sink in!

Now, before I go any further, one more bit of handholding, please.

Here's my current layout and I'd like to be sure I know the proper motor order, from M1?

My batteries arrived a few hours ago, further incentive to get this buttoned up (along with iOSD Mini and Ground Station, Tarot gimbal, Fatshark, FlyTrex.)

thanks again!
 

Attachments

  • IMG_1690.JPG
    IMG_1690.JPG
    71.6 KB · Views: 321
Re: Video: Fitted my Phantom v1 into a Phantom 2 shell (easy

M1 is top right, M2 is top left, M3 is bottom left and M4 is bottom right.(from pic you posted)
After you plug them in, move your naza towards the front as far as you can, this will allow
space to plug your LED into the back of the Naza so you have no problems putting the top on.
 
Re: Video: Fitted my Phantom v1 into a Phantom 2 shell (easy

djp4059 said:
M1 is top right, M2 is top left, M3 is bottom left and M4 is bottom right.(from pic you posted)
After you plug them in, move your naza towards the front as far as you can, this will allow
space to plug your LED into the back of the Naza so you have no problems putting the top on.

^
|
|

What he said ;) Especially shuffling the NAZA forward if you are using the v2 LED. Trial fit the chunky plug and then trial fit the lid and you'll see why it is suggested. Just keep an eye on M4 ESC cable (bottom right in your pic) as that is the one that needs to travel furthest. The NAZA is fine being off the centre axis slightly (left or right in your pic).

Looks like you are getting there GL. If nothing else this process really gets you confident about knowing how your Phantom works on the inside and that is no bad thing believe me! :D
 
"Sticky" P2 battery, Traxxas plug

I slipped a P2 battery into the shell to test the fit and was surprised to find that I couldn't get it back out -- it was very firmly stuck in place. In the end, I very carefully applied leverage to the back end of the battery with a large screwdriver, which moved it enough that I was able to pull it out from the front.

I can't believe this is normal so I assume I'm going to have to Dremel material from the battery bay. But, it seems odd so I wonder if anyone has run into this before? (Alternatively, I could sand down the P2 battery case(s), perhaps wipe the exterior with a very good lubricant?)

The second issue is the Traxxas-to-XT60 plug adapter, pictured below. The Traxxas teeth are surrounded with plastic, which prevents the plug from entering the P2 battery. It looks like another minor Dremel job to remove that plastic but again, for anyone following in my somewhat meandering footsteps, something else I didn't expect.
 

Attachments

  • traxxas_1692.JPG
    traxxas_1692.JPG
    42.7 KB · Views: 315
Re: crimpers, connectors, leads

As I contemplate the combined mass and weight of the various cables & connectors I'm revisiting the idea of replacing as much wiring as possible with lighter leads. But, I'm unsure of the specific type of connectors or pre-made leads I'll need for such things as shortening the V2 LED module cable and perhaps also the iOSD Mini to PMU cable and Canbus connectors.

I have the link given much earlier to a good quality crimper but could someone please enlighten me further on specific connectors? I'm just not very familiar yet with the terminology and correcting mistaken orders takes soooo long!


gen3benz said:
DeweyAXD said:
Nice lightweight way of doing it the gen3benz - i've found those single crimp connectors really handy over this project. Well worth getting stocked up on them imo.
These leads came with 22 gauge wire and they really dwarf the tiny wires attached to the P1 LED. So it seemed like a bit overkill.
My stripper only goes down to 22 gauge so I used to soldering iron to melt a bit of insulation off. Not used to this tiny wiring at my shop. :)
Was looking at micro JST connectors, but they are a bit more expensive.
 

Attachments

  • 1.5components_1691.JPG
    1.5components_1691.JPG
    72.4 KB · Views: 336
Re: Video: Fitted my Phantom v1 into a Phantom 2 shell (easy

I'll start with the post before about trax GL.

Yep you need to cut the plastic off it. You may also need to chop a little more out of it too as the internal standoffs bang into it.

More detail on this part of my blog (about half way down post 12 but worth looking over the rest if you've not seen it already): http://www.rcgroups.com/forums/showpost ... stcount=12

If you are using a P2 battery you'd be wise long term to do the modifaction below that in my blog where I fit the DJI Internal Power Connector... its dead cheap and you can solder an XT60 onto the back of it to remove the awkward behaviour when sliding the P2 battery in with the Traxx connecter.

On the subject of the sliding of the battery... they loosen a little over time but you can easy it up with a little silicon spray (safe for plastic to plastic). Avoid chopping too much from the battery or the inside runners because a firm battery is a lot better than a sloppy loose one. Personally I shaved a tiny amount off the clips on the battery... just a little sand paper did the job.

The connecters that you need to make your own wires are called different things in different countries. Here (UK) they are called Header connectors (As they are mostly used in PC builds) so for the LED wire you would need a 4 pin header plug. The crimps inside the plug are just 'crimp terminals'.

I'm sure the guy from your part of the world can point you toward the right names there.
 
Re: Video: Fitted my Phantom v1 into a Phantom 2 shell (easy

Thanks again, Dewey. I've ordered the internal plug and now I'm off to the hardware store for additional wire -- a three hour round trip. :(

DeweyAXD said:
I'll start with the post before about trax GL.

Yep you need to cut the plastic off it. You may also need to chop a little more out of it too as the internal standoffs bang into it.

More detail on this part of my blog (about half way down post 12 but worth looking over the rest if you've not seen it already): http://www.rcgroups.com/forums/showpost ... stcount=12

If you are using a P2 battery you'd be wise long term to do the modifaction below that in my blog where I fit the DJI Internal Power Connector... its dead cheap and you can solder an XT60 onto the back of it to remove the awkward behaviour when sliding the P2 battery in with the Traxx connecter.

On the subject of the sliding of the battery... they loosen a little over time but you can easy it up with a little silicon spray (safe for plastic to plastic). Avoid chopping too much from the battery or the inside runners because a firm battery is a lot better than a sloppy loose one. Personally I shaved a tiny amount off the clips on the battery... just a little sand paper did the job.

The connecters that you need to make your own wires are called different things in different countries. Here (UK) they are called Header connectors (As they are mostly used in PC builds) so for the LED wire you would need a 4 pin header plug. The crimps inside the plug are just 'crimp terminals'.

I'm sure the guy from your part of the world can point you toward the right names there.
 
Re: Video: Fitted my Phantom v1 into a Phantom 2 shell (easy

Thanks Dewey, more cash spent but well worth it. P1 with CAN Bus plug now fitted in P2 shell with mini iOSD, BTU & Naza LED. Just order a couple of P2 batteries and the IPC now (oh and a P2 battery charger)

Did a full spray job on the P2 shell before doing anything.


Sent from my iPad using Tapatalk HD
 

Attachments

  • ImageUploadedByTapatalkHD1399411873.459855.jpg
    ImageUploadedByTapatalkHD1399411873.459855.jpg
    485 KB · Views: 298
Re: Video: Fitted my Phantom v1 into a Phantom 2 shell (easy

GearLoose said:
Thanks again, Dewey. I've ordered the internal plug and now I'm off to the hardware store for additional wire -- a three hour round trip. :(

These are the ones I ordered, you can easily clip the connectors off the ends: http://www.pololu.com/category/68/male- ... mper-wires

This is the site ElGuano turned me on to for connectors and crimpers: http://www.hansenhobbies.com/products/connectors/ (They also have thicker gauge wire there for power leads)
 
Re: Video: Fitted my Phantom v1 into a Phantom 2 shell (easy

OI, can you please tell me the proper American term for the connectors I'll need? I went to our local Hobby Town store this afternoon. A pathetic selection of servo leads and no individual connectors. I'm unclear on what I'll actually need so I don't mind ordering an assortment, just-in-case. I'm beginning to feel a bit of pressure to get this done as I have a "mission" to fly for our local land trust....


OI Photography said:
GearLoose said:
Thanks again, Dewey. I've ordered the internal plug and now I'm off to the hardware store for additional wire -- a three hour round trip. :(

These are the ones I ordered, you can easily clip the connectors off the ends: http://www.pololu.com/category/68/male- ... mper-wires

This is the site ElGuano turned me on to for connectors and crimpers: http://www.hansenhobbies.com/products/connectors/ (They also have thicker gauge wire there for power leads)
 
Re: Video: Fitted my Phantom v1 into a Phantom 2 shell (easy

GearLoose said:
OI, can you please tell me the proper American term for the connectors I'll need?

You bet, just depends on exactly which cables you want to shorten and/or replace. If you can give me a final list I'll let you know what you'll need. For starters, if you want to shorten the lead coming from the NAZA LED module to the NAZA, you'll need to cut off the existing connector and shorten the wire as desired, then use these crimp-on connectors and housing to replace the stock one you cut off:
http://www.hansenhobbies.com/products/c ... /pt1in_ft/
http://www.hansenhobbies.com/products/c ... pt1in_1x4/

Some of the other changes may not even require new connectors...if you take the shell off the iOSD mini for example, you can solder the wires to it (from the Data Link) and from it (to the PMU) directly to the iOSD board, which will allow you to shorten the existing canbus cables like with the LED cable.

Btw, if you're going to be ordering from Hansen anyway, here's some good things to grab a few of while you're at it:

-JST connectors, which are the red ones at the top of this page (and the related crimp-on connectors): http://www.hansenhobbies.com/products/c ... onnectors/
These are commonly used on power leads to a wide range of common accessories on Phantoms and other multirotors

-Futaba J servo connectors, the same kind DJI uses for all the ESC and board connections to the NAZA, with the keyed tab: http://www.hansenhobbies.com/products/c ... rs/sc_fjh/
http://www.hansenhobbies.com/products/c ... /pt1in_ft/
These can be used to customize the lengths of your ESC cables, or for any other accessory you end up connecting (gimbal, etc).

-JST-XH connectors, these are the same ones you'll find on the balance tap on 3S batts, and can be used if you need to replace one of those:
http://www.hansenhobbies.com/products/c ... m_X57_1x4/
http://www.hansenhobbies.com/products/c ... mm_X57_ft/

-Servo wire/power wire, might as well grab some while you're at it:
http://www.hansenhobbies.com/products/c ... ire/servo/
http://www.hansenhobbies.com/products/c ... e/battery/

That should cover most anything you would need for this project or many others.
 
I should have never got up this morning...

I think this is it for me and Phantoms...

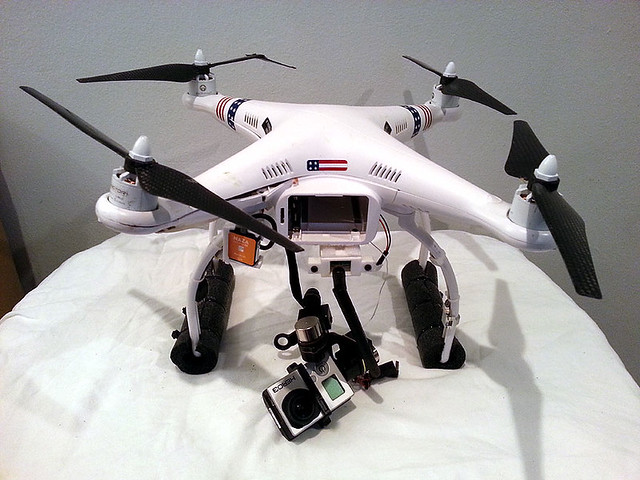
I took out the P1.5 today to try out my Fatshrk FPV... It was a beautiful day, so I just wanted to take the Phantom up and do some distance, knowing I had the ability to "see" where I was going.

I got it in the air... Slightly wobbly as expected (I now presume it's because of the extended-wide legs - right to the point, they are CRAP!).

I got some great height, about 1,800+ feet away from me... FPV was pretty good... I figured I would let it hover for a bit while I yaw CCW to get my bearings... That's when the Phantom STOPPED responding to my commands... I could stop it and yaw CW but it fought me to continue it's spin CCW... I tried to continue forward and back, but nothing... Then I started to see, through my goggles, that the Phantom was becoming erratic as if it was possessed - AGAIN! I panicked! (and this is where I think pilot error came in). I turned off the TX to kick in RTH, but I watched it fall out of the sky, through my goggles, until I saw snow...

Unfortunately, I didn't turn on my GoPro, and yet I was flying though it's lens... I didn't put a micro card in the FlyTrex... This first flight was supposed to test out my FPV, so I forgot about everything else...

I did put my Garmin GTU 10 on board and it was working. I traced the signal of the GPS to a wooded area a third of a mile away near a dirt path... I looked for an hour and the GPS tracker said it was near a tree ... I saw nothing, I looked above in the trees... nothing... But the GPS tracker kept telling me the Phantom was there. I could only assume that the GPS got knocked off as the Phantom plunged through the trees, and my P1.5 was somewhere in the vicinity... I also realize these GPS trackers aren't a hundred percent accurate, so I looked everywhere I could. The ground was quite thick with brush... Good thing it wasn't summer, the brush would have been worse.

One hour later a guy called and told me he watched my Phantom crash through the trees and land near the tree I was looking around. He said he picked it up, waited a little while, then took it home with him... (Good thing I had my phone number on the shell). He wanted to return it, and I was going to reward him, but he actually asked for a reward (the nerve). He gave me his address and I went to pick it up...

Being from NYC (Queens), I was just happy he called and, needless to say, I felt obligated to give him a generous reward... Only because I'm a bad business man and figured I was from NY (an expensive freakin' city to live in) and lost $1,500.00 worth of Phantom. So, with that being said, I'm kicking myself in the *** because I know I gave him too much... Especially since his wife gave me **** on how it fell 5 feet in front of them, she could have been killed, she thinks these things are illegal to fly in Queens Parks and that she actually asked me if I was spying on her through the GoPro...

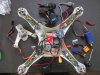
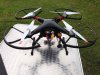
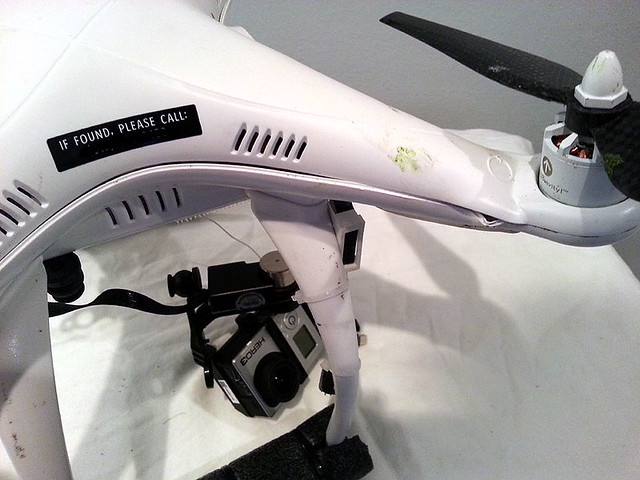
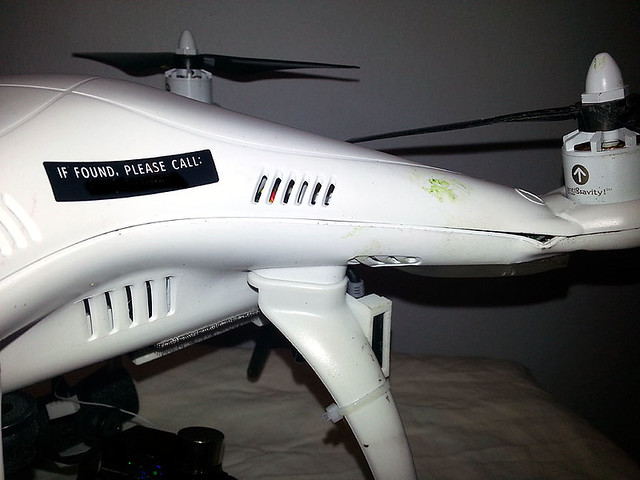
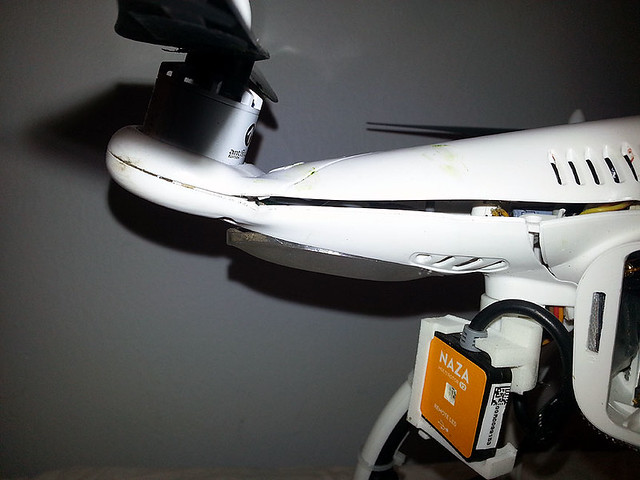
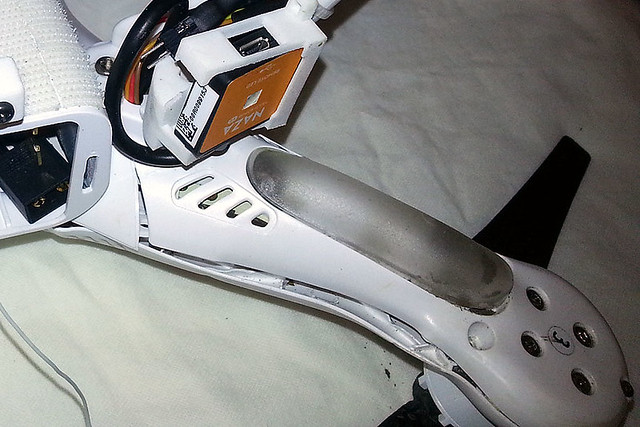
Anyway, I got it back... The damage is intense (at least $150.00 looking on the outside, I haven't even opened it yet to see the damage in there). I don't know what works and what doesn't at this point... So, check it out for yourselves below... I'm so depressed, I think I'm through flying this Phantom... Please guys, try and talk sense to me... Should I rebuild it again, or just sell it for parts and get something else to fly? (PS: my f550 is ready to fly but I'm afraid to take it up in this area thinking it will probably become possessed because of city interference).


13940646567_70dd56225c_z.jpg


14104139456_8abe5c57b8_z.jpg


14127329015_1d7f58b9f5_z.jpg


14127611224_585aaa2767_z.jpg


14127331365_1156fc1b94_z.jpg


EDIT: I went back to that tree and finally did find my Garmin... It was hidden under branches. Next to the Garmin was also a piece to the Naza v2 Dewey mount that broke off. One of the Zenmuse anti-vibration balls is gone... I should count myself lucky...
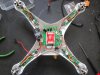
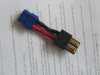
 
Re: Video: Fitted my Phantom v1 into a Phantom 2 shell (easy

Wow.

Your reply (and shopping list) should be a sticky somewhere! Seriously good info, very much appreciated.

And it brings up a related question: in my quest to reduce weight and increase internal space, I'm not trying to imitate El Guano, but I do face a kind of "ship-in-a-bottle" situation trying to fit everything within the shell.

Do you think it is worth replacing my existing P1.0 board with the upgrade board? I use a Tarot gimbal, Fatshark 250 mw tx, and will be adding the iOSD Mini and Ground Station. I'm unsure, however, if the upgrade board offers enough advantages compared to the expense and installation time.

On the other hand, perhaps the upgrade board is justified as "in for a penny, in for a pound"?

Again, many thanks for your detailed reply.

OI Photography said:
GearLoose said:
OI, can you please tell me the proper American term for the connectors I'll need?

You bet, just depends on exactly which cables you want to shorten and/or replace. If you can give me a final list I'll let you know what you'll need. For starters, if you want to shorten the lead coming from the NAZA LED module to the NAZA, you'll need to cut off the existing connector and shorten the wire as desired, then use these crimp-on connectors and housing to replace the stock one you cut off:
http://www.hansenhobbies.com/products/c ... /pt1in_ft/
http://www.hansenhobbies.com/products/c ... pt1in_1x4/

Some of the other changes may not even require new connectors...if you take the shell off the iOSD mini for example, you can solder the wires to it (from the Data Link) and from it (to the PMU) directly to the iOSD board, which will allow you to shorten the existing canbus cables like with the LED cable.

Btw, if you're going to be ordering from Hansen anyway, here's some good things to grab a few of while you're at it:

-JST connectors, which are the red ones at the top of this page (and the related crimp-on connectors): http://www.hansenhobbies.com/products/c ... onnectors/
These are commonly used on power leads to a wide range of common accessories on Phantoms and other multirotors

-Futaba J servo connectors, the same kind DJI uses for all the ESC and board connections to the NAZA, with the keyed tab: http://www.hansenhobbies.com/products/c ... rs/sc_fjh/
http://www.hansenhobbies.com/products/c ... /pt1in_ft/
These can be used to customize the lengths of your ESC cables, or for any other accessory you end up connecting (gimbal, etc).

-JST-XH connectors, these are the same ones you'll find on the balance tap on 3S batts, and can be used if you need to replace one of those:
http://www.hansenhobbies.com/products/c ... m_X57_1x4/
http://www.hansenhobbies.com/products/c ... mm_X57_ft/

-Servo wire/power wire, might as well grab some while you're at it:
http://www.hansenhobbies.com/products/c ... ire/servo/
http://www.hansenhobbies.com/products/c ... e/battery/

That should cover most anything you would need for this project or many others.
 
Re: Video: Fitted my Phantom v1 into a Phantom 2 shell (easy

PJ,

Sorry to hear of your incident, I feel your pain I've been there a couple of times during my build. I keep having to remind myself "this is a hobby and I'm enjoying it".

As far as if to continue or not - that's a call only you can make. You have a ton of options - you can rebuild (it's probably not as bad as it appears) yes the shell is pretty much toast but internally I'll bet it's pretty sound. You can also transfer most if not all to another frame 450, etc... You can return it to a more stock style gimbal etc but with P2 battery set up that you've built. Overall you'll have to decide which path to take but I suspect it's not a bad as it feels right now.
 
Re: Video: Fitted my Phantom v1 into a Phantom 2 shell (easy

Oh man PJ, that's heartbreaking :cry:

Well, the good news is that the damage I can see on the Phantom itself (without looking inside yet) is nothing you can't fix...in fact you've been practicing for this emergency for weeks now. Still, I know it's hard not to let your pride get as dented as the poor shell there, I know I'd be crushed.

I'm thinking the wider gear themselves might not be messing with your stability, but rather the foam pads on them that are now stuck out in the downwash from the props. As for the cause of the crash, it's very hard to say...sounds like maybe one motor (or blade) stopped spinning as fast for some reason but was still providing some lift/torque. If you'd completely lost power on one axis, it would have just dropped from the sky like a shot pheasant (not autorotating like yours seemed to do at least initially).

Actually...now that I think that over some more...it might not be right. When I threw a prop once, that's how it fell...fast and with no grace whatsoever. But, if the prop stayed on but wasn't powered anymore, it might cause behavior like what you saw. So, maybe you did just lose full power on one motor, I can't really say.
 
Re: I should have never got up this morning...

PJA, I have very limited talent as a pilot and more than average crash experience. Last week I dropped my very pricey QuadH2o into a tree, forty feet above the ground. I've water-crashed my P1 three times, hit trees at the 60 - 80 foot level and buried motors in sand bars. I know from painful experience that it takes me a few days to recover from the shock, dismay and self-doubt. And in your case, basically being abused by so-called "Samaritans", I imagine the experience is especially bitter.

My advice is to take some very deep breaths and wait at least a few more days before making any decision about the Phantom. , It looks as if the shell and props are obviously toast. Based again on my own crash history, however, I would not be surprised at all if the internal components are ok.

Good luck!

PJA said:
The damage is intense (at least $150.00 looking on the outside, I haven't even opened it yet to see the damage in there). I don't know what works and what doesn't at this point... So, check it out for yourselves below... I'm so depressed, I think I'm through flying this Phantom... Please guys, try and talk sense to me... Should I rebuild it again, or just sell it for parts and get something else to fly?
 
Re: Video: Fitted my Phantom v1 into a Phantom 2 shell (easy

Please guys, try and talk sense to me... Should I rebuild it again, or just sell it for parts and get something else to fly?

PJA that is a gut wrenching story and an even more gut wrenching set of photos after you spent so much time, effort and money on it.

I think the important thing to bare in mind is that, for all the pain of it, you still have the Phantom in your hands and compared to a fair few people in situations like this, that is pretty rare.

I've felt what you are feeling to a lesser extent and to be honest, as GL suggests, the best thing for you to do right now is walk away from it for a few days (or even weeks) and see how you feel. I will put money on the fact that you'll look at it one evening after the frustration has died down and you will decide to take a little look at it more closely in a pragmatic view to what is required for a repair.

You've learnt so much about the internals of the Phantom that it seems a shame to walk away from it totally but if after a few days you are still not feeling it then put the parts to a new project.

I could be wrong but personally I'd look at those CF props in terms of what happened.... it sounds like the hub might have slipped/cracked? Do they all feel tightly onto the motors post crash? Your description of how it went down does sound similar to my experiances with prop slip but it could just have been a good old fashioned freak out flyaway with no possible way of knowing. To be honest I don't think it is worth speculating too much on it. Sad fact is that we all run the risk of moments like this but you did everything 100% right to recover your $1500 of kit (Garmin + Reward sticker).

First thing is first, when you do get over the initial pain of it all, strip it all down, check the main board, check the motors shafts aren't bent. If your mainboard has no breaks then you should be golden. If there is any doubt then you'd do well to buy a 330 flamewheel frame and use it to test the components out 'real time'. I suspect a re-shell will be all that is needed but the Zenmuse is of course the most sensitive part (hard to tell from the pics how bad that is?).
 
Re: Video: Fitted my Phantom v1 into a Phantom 2 shell (easy

PJA - ouch, really sorry to see those pictures. Crashes are unfortunately a sad fact of life with hobby quads. Anyone who's flown a few dozen hours has had them, and you can never eliminate the possibility. But that doesn't make it any easier.

I'd strip it down and take stock of damage. With a hard crash, it's pretty easy to inspect for physical damage. What I've never been really sure about is how the sensitive electronics (e.g., NAZA) is affected. A hard bang shouldn't cripple it, and you can probably check most function through the Assistant values and IMU calibration, but part of me always wonders if it's more likely to crap out some time after a hard crash. Also check the GPS antenna, there have been several reports of that cracking.

Whether or not you rebuild the Phantom, you'll probably have enough spare parts to put together a beater quad, if you're interested in that kind of thing.

GearLoose: The upgrade board path is more work, but unless you're going to replace your Tarot with an H3-3D in the future, it's probably the more efficient solution. It'll support your iOSD and Datalink without needing a Can-Hub or extending the Sarawuth mod further.

If you're planning on going with the 3-axis Zen when the standalone is released, EMC mentioned earlier that the upgrade board doesn't work with it, so you'd need to work in a GCU solution anyways...
 
Re: Video: Fitted my Phantom v1 into a Phantom 2 shell (easy

ElGuano said:
If you're planning on going with the 3-axis Zen when the standalone is released, EMC mentioned earlier that the upgrade board doesn't work with it, so you'd need to work in a GCU solution anyways...

I want to publically state my annoyance with that info, I've been steaming about it since I saw EMC post it. I was just about ready to get an H3-3D to use on my 1.5, thinking that the upgrade board should work with it since the H3-2D GCU and P2 mainboard do :evil:

I'm hoping that when (if!) DJI releases the stand-alone GCU for the H3-3D they'll also have a firmware update for the upgrade board.
 

Recent Posts

Members online

Forum statistics

Threads
143,102
Messages
1,467,658
Members
104,991
Latest member
tpren3