Re: Video: Fitted my Phantom v1 into a Phantom 2 shell (easy
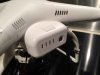
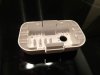
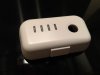
Well my Phantom 2 battery cover has arrived. No this is not a 3D printed version. This is an original battery cover which I purchased from a store direct from China. Cost less than $20 as well!! Good quality (matching!) plastic and very light as well. Took a while to arrive but maybe I was just unlucky.
Very pleased!!")
Well my Phantom 2 battery cover has arrived. No this is not a 3D printed version. This is an original battery cover which I purchased from a store direct from China. Cost less than $20 as well!! Good quality (matching!) plastic and very light as well. Took a while to arrive but maybe I was just unlucky.
Very pleased!!