looks like it might answer your question.
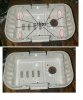
I have split a phantom 3 battery case and the top is held on by 8 clips & what looks like 4 glued 'spigot' joints, the latter are ringed in red in the attached. At a guess the P2 battery is similar.
The clips are relatively easy to displace and thin but stiff plastic can then be slipped under them to keep them displaced. I do not know if the glue of the 'spigot' joints will soften with heat but, following a youtube video for the P3 battery, I knocked the top off with the handle of a table knife, in the video I recollect a pair of mole grips where used as the slide hammer..
I split the main body of the case by MANY times LIGHTLY drawing a scalpel along the seam, you do not want the scalpel etc.to penetrate, patience and persistance is needed.
If the P2 halves are joined the way my P3 halves were, the guy in the P2 video must have shoulders like King Kong !
I worked first on the sides at the bottom of the battery, when their seams are 'cut' I work on the seam across the bottom of the battery.
The seam around the top end of the battery seemed more robust as it also housed the battery connector but with the bottom of the case slightly splayed it was cut in then same manner, i.e. sides first and the top near enough came apart after a few passes with the scalpel.
The grey cover around the cells may well be metal and provide some protection for the cells but don't bank on it and cut very carefully.
My shell will be perfectly reusable with say a bead of impact adhesive around the seams.