Rotorpixel (429) was shipped on Friday, 4/11 by Canada Post. Tracking number worked usps.com website. Arrived on Tuesday, 4/16 in good shape.
Unboxing was similar to Pull_Up's video, with minor exceptions. There is a black thumbscrew with a black fitting that goes into the left “ear” of the camera. The white thumbscrews that go into the damping balls in the early videos show a five-sided star shape. Mine are two-sided, more like turn-keys, probably for ease of counting turns. The 3D printed parts are satisfactory in appearance, you can tell however, they were printed with the speed turned up, probably in order to push production quantities.
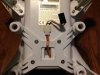
The metal CNC parts of my set up were fairly dirty. Some black, dusty gunk (oxidation maybe) was on all of those parts. The stuff was carried over on some of the white 3D printed parts (maybe during testing and packaging) and gave them a dusty, dirty appearance too. I'd suggest wiping those parts well before handling them to prevent making a mess on the rest of your set up.
The printed instructions are fairly easy to follow. I'd add a step to remove the battery before starting the actual installation. Removing the camera from the original is “fiddly”, you'll have to put some significant pressure on the camera ears to remove it from the original gimbal.
Step 12 of the instructions refers to a small white spacer that goes into the left camera ear. In my kit there was a black thumbscrew and black spacer – so I believe this is a mod and the instructions have not been updated.
After connecting the cable from the inside of the P2V to the gimbal, you'll want to make sure there are no pinched wires. I used the allen wrench to keep tension on the wire bundle while attaching the metal isolation plate to the white damping balls. By doing this, it left a good amount of slack in the wire bundle with no pinching between the top plate and aircraft body and no interference with any moving parts.
The redesigned white thumbscrews went in easily and I did not have to slip the isolation plate down onto them – just screwed them in for 7 turns. Before powering up, check that all connections were well seated and pushed all the way in.
With the Rotorpixel mounted and sitting on a flat surface, my camera just bottoms out. I raised the PV2 up by putting 1” x 2”s under the landing gear. This allowed the gimbal to boot up for the first time without touching anything or bottoming out. Once it “woke up” and aligned itself, after 5 seconds, it was balanced and aligned and almost silent. No vibration or rattling noises.
For the first flight, I used the 1” x 2”s to launch from – again so that the camera was not bottoming out. There was a significant increase in left stick up required to make a positive lift off. I used full left stick up, where I rarely had to do that with the original gimbal. This was not a big deal – just be ready to apply more left stick due to the added weight.
This flight was in very light winds. The Rotorpixel performance was excellent. No jello, no props in view and very, very little yaw correction in GPS mode. I am pretty convinced, that with smooth flying I'll get very good video clips. I am and will continue to be a hand landing guy, especially with the camera now hanging right down to the same level as the landing gear.
I have a TradeCraft case. I will have to make a few minor modifications to make my PV2/RotorPixel fit properly. It will fit – but it will require some minor surgery to the TradeCraft case first.
Overall, I'm very impressed and glad I have this setup. I'll have to wait for windier conditions to see if I think the third axis will be necessary. At this early stage, as a first impression I'd rate it a 9.25 out of 10.00.


")