Vision Camera Stabilizer

Joined
Dec 4, 2014
Messages
14
Reaction score
0
Hello everyone,

Im looking for an alternative to having to purchase an action camera and stabilizer for the phantom vision. Im looking for a plug and play solution similar to Rotorpixel Phantom 2 Vision Gimbal. The solutions looks good but a bit on the steep side. For the price I can opt for a vision+ camera but looking for a bargain.

Any suggestions ?

Thanks

Jaimes
 
Hello Jaimes,
Unfortunately none of the newer gimbals are TRUELY Plug-n-play!
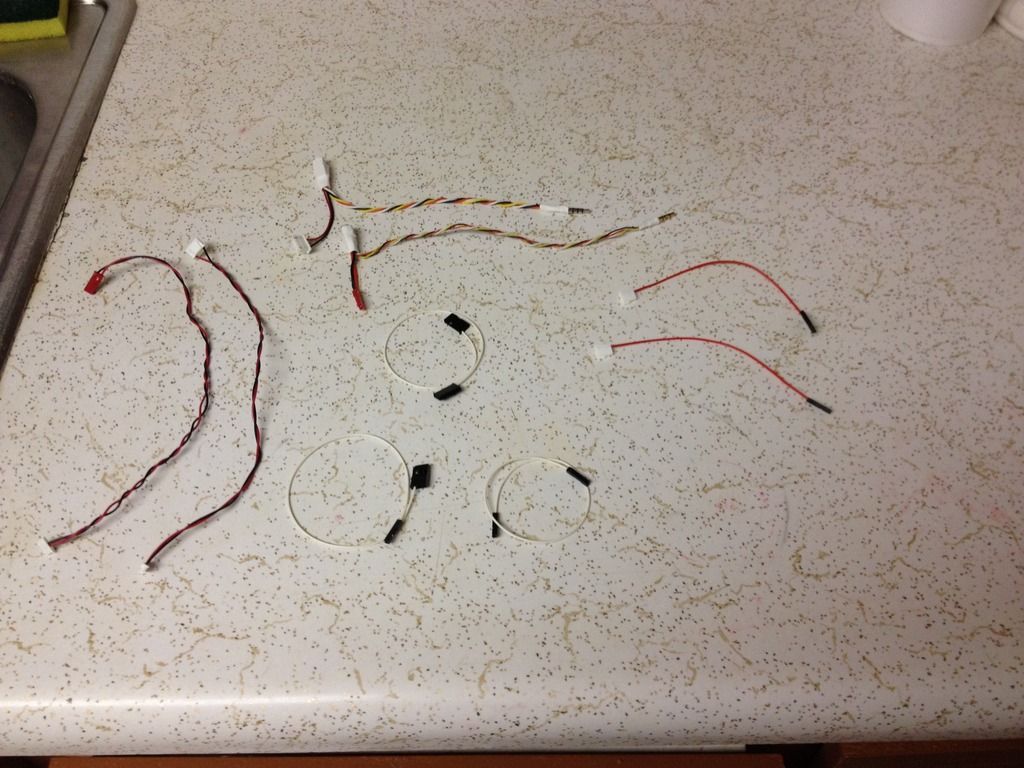
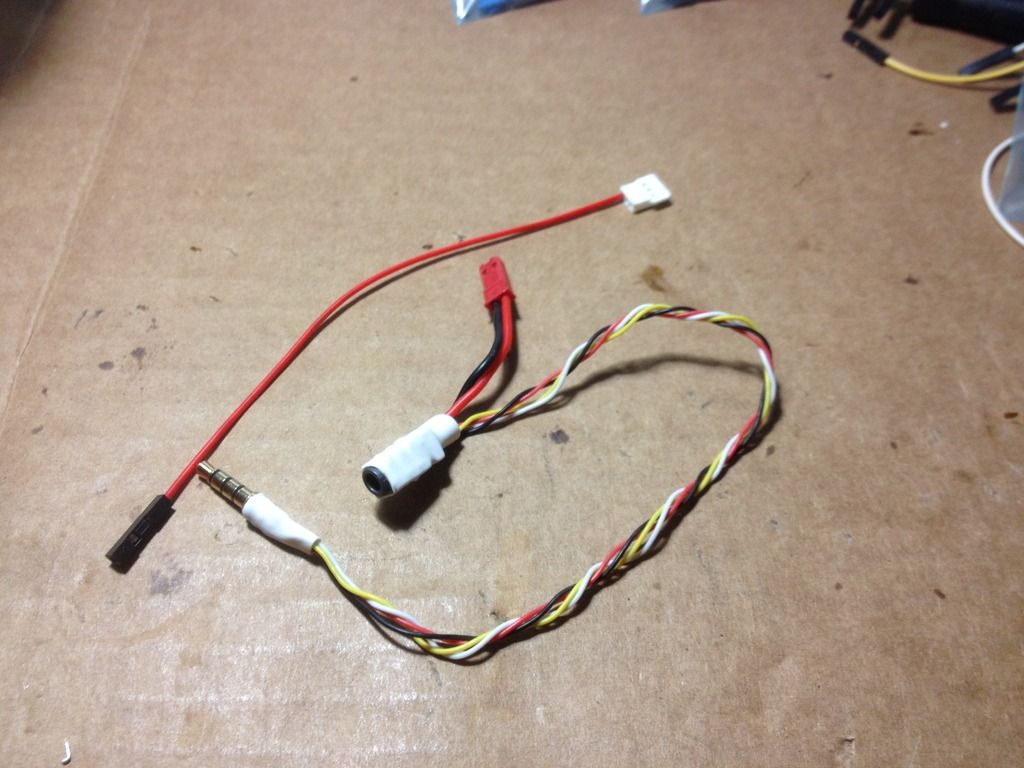
However I make wiring harnesses to make them plug -n- play!
They have the special 2-axis gimbals , and 2-axis gimbals on eBay as low as $66, your vision camera screws right on, I make an extension wire for your stock vision servo wire, to gimbal, and a special wire from your camera plug to camera w/ power whip ( no need to open phantom ) I'm assuming you have a vision non plus?

Anyhow here are a few of the wires I build, I can make most any gimbal plug-n-play! To the vision non plus!
AA89F28B-A10B-4179-9284-BDF50690975E_zpsa2olm0nj.jpg


Let me know if you need wires!
J Dot
 
  • Like
Reactions: dirkclod
Hello Jaimes,
Unfortunately none of the newer gimbals are TRUELY Plug-n-play!
However I make wiring harnesses to make them plug -n- play!
They have the special 2-axis gimbals , and 2-axis gimbals on eBay as low as $66, your vision camera screws right on, I make an extension wire for your stock vision servo wire, to gimbal, and a special wire from your camera plug to camera w/ power whip ( no need to open phantom ) I'm assuming you have a vision non plus?

Anyhow here are a few of the wires I build, I can make most any gimbal plug-n-play! To the vision non plus!
AA89F28B-A10B-4179-9284-BDF50690975E_zpsa2olm0nj.jpg


Let me know if you need wires!
J Dot
Very interested! What do you charge for the cables?
 
Very interested! What do you charge for the cables?


Depending on what bird, and gimbal you have, usually $12-$15 U.S. Shipped, and international $12-$15 + ship to anywhere else
Most wires are $12 for a set! For the vision, the earlier models WITHOUT servo wire, requires a different install, and is a bit more $, as the wires are more complex!

I'd be happy to explain the different ways to hook them up! As there are several options from plug n play without opening shell, to full instal from naza to gimbal, and power for gimbal! Depending on what you'd prefer doing?

J Dot
( ps my alerts aren't working very well, if any of you need to get ahold of me type this in your post ( @jdot )

Take care!
 
  • Like
Reactions: dirkclod
Hello @jdot, I have a Phantom 2 vision and in need of wires! Especially the wire set that goes to the stock servo gimbal, it's showing signs of heat at a factory installed sharp bend leading out of the P2V housing to the servo. I know I will have to take apart my PV2 to make the connections but need the wire first. Any input is greatly accepted!

Wormgrunter
Worm flag him like this @J Dot
 
Today I installed one from AliExpress.com that came with all the cables, including camera extension. Installation was pretty straight foward. Putting the gimbal in took about 1.5 hrs, much of which was searching for info.

  1. Remove the existing gimbal from the P2V. No pictures for this. If you can't remove the existing one, stop now.
  2. This kit plugs into the Naza unit directly, so you need to remove the top shell. Instructions are here.
  3. Unplug any wired in F1 and F2. There should only be one. This is your pitch control. Replace it with one from the kit. Attach a label to it called pitch at the other end. If you have roll control on your transmitter, also hook up the other one. I did both because I didn't know any better.
    2016-01-16 10.56.45-10.jpg
  4. Route the wires out through the hole in the bottom shell above the gimbal.
  5. Route the wires through the gimbal top plate and secure the plate in place. Make sure the dampers are in the top plate, not the gimbal.
    2016-01-16 11.02.00.jpg
  6. Attach the wires from the Naza unit to the gimbal controller. Gimbal Roll/Pitch is labeled on the board. Check the Naza picture and this one to make sure they are hooked up right side up. I would expect your color coding to vary.
    2016-01-16 11.03.22.jpg
  7. Attach the gimbal to the gimbal top plate.
  8. Remove the camera from the old gimbal. I didn't take any pictures :(
    1. Remove the rubber plug from the left leg on the camera.
    2. Remove the phillips head screw.
    3. There is a small plastic piece held in by the screw. Remove it.
    4. Gently remove the camera from the gimbal.
  9. Flip the camera upside down.
  10. On the bottom there are four screws. Remove them and replace with the brass standoffs provided. They are a different thread pitch and difficult to install. Do not over tighten or you'll break it off like I did on one of three. This is not repairable! I have to fly with three.
    2016-01-16 11.26.22.jpg2016-01-16 11.27.34.jpg
  11. Using the screw provided (fortunately, mine came with only 3), attach the egg to the gimbal.
  12. Tidy up the wiring and reassemble the top shell. For the Naza wires going to the gimbal, make sure they can't be pinched by the battery. I used masking tape to hold them on the front wall and gathered up all the wires into a neat spot inside the shell.
    2016-01-16 11.45.34.jpg 2016-01-16 17.03.20 edited.jpg
  13. Connect the camera wires and tidy them up.
    2016-01-16 11.31.18.jpg2016-01-16 17.02.54.jpg
  14. Power it up and see if everything turns on. Check FPV with your phone app.
  15. Next comes gimbal calibration.

 
BGC Gimbal Calibration
  1. Download BGC GUI version 2.2b2 from here. Extract it to a directory. No installation needed.
  2. Connect to your PC with a micro usb cord. The plug is on the left front of the gimbal.
    2016-01-16 18.04.36.jpg
  3. Run BGC. Follow the manual instructions to connect to the gimbal.
  4. Save the "as delivered settings"
  5. The settings I made work are here.
    ScreenHunter_09 Jan. 16 18.04.jpg ScreenHunter_07 Jan. 16 18.03.jpg ScreenHunter_08 Jan. 16 18.03.jpg ScreenHunter_09 Jan. 16 18.03.jpg
  6. Make sure to hit the Write button.
  7. Save the new settings.
  8. Open Phantom Assistant and connect your phantom to your PC.
  9. Configure the gimbal page. Important: Set the gains to 0. This drove me nuts for hours. Should have looked here.
    ScreenHunter_09 Jan. 16 18.15.jpg
Good Luck.
 
Sweet,
I wish you wrote to me as I make plug n play harnesses for those gimbals, no opening phantom, no soldering, ect!

0807F20F-55ED-4448-93AD-DB73014F0B7A_zpsbzjhunhu.jpg


J Dot
 
i didn't do any soldering. It came with all the cables. I did have to plug straight into the Naza, but that was only a 10 minute detour. Software settings was my down fall.
 
Today I installed one from AliExpress.com that came with all the cables, including camera extension. Installation was pretty straight foward. Putting the gimbal in took about 1.5 hrs, much of which was searching for info.

KenW: Exactly which gimbal was this? Ali Baba sells a few. I wanted to find one tested and tried. How is that one working out for you, after some time and use?
 
KenW: Exactly which gimbal was this? Ali Baba sells a few. I wanted to find one tested and tried. How is that one working out for you, after some time and use?
Click the aliexpress.com link in my post and you'll have it. $65 with all the cables. I haven't flown it yet because the weather has been bad and I don't have longer landing gear yet (snap on extenders are enroute). hopefully I'll fly by this weekend.
 
Standard 3, my camera and wires became detached i installed a new harness and have 2 extra wires any clue on where they go on the camera or gimbal. . Anyone little help please
 
So I finally had good enough (cold with very light rain) weather to try my setup. Powered on, could not get a satellite fix. WTF???? Then it dawned on me, when I put the shell back on, I didn't plug the GPS antenna in. Took it back apart, fixed it and tried again. Flying, the gimbal is rock solid. low speed, high speed, it didn't matter. The camera did not move unless the aircraft tilt exceed the limits of travel I put in (pull up/down in particular). All told, it flies pretty nice.

I did find the video to be tilted in the horizontal, but found a YouTube video telling how to fix it. Next flight we will see how well my new zero point works.
 
Click the aliexpress.com link in my post and you'll have it. $65 with all the cables. I haven't flown it yet because the weather has been bad and I don't have longer landing gear yet (snap on extenders are enroute). hopefully I'll fly by this weekend.
Have to put this on the backburner. Just got a good deal on a 3 Pro bundle. Got all I can handle for awhile ;)
 
J dot I send U a pm.... ;)
Finaly i find some who can do that on my bird :)
 

Members online

Forum statistics

Threads
143,087
Messages
1,467,536
Members
104,965
Latest member
cokersean20