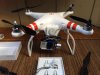
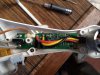
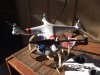
Recently I purchased a set of T-Motors for my Phantom 1.2. I use a heavy gimbal and wanted better flight performance in addition to longer flight times. The T-Motors would deliver on both. The one thing I dreaded was trying to solder the the motor leads to the circuit boards where the motor connectors are located. It's a small space and one slip of the soldering iron would mean getting a new circuit board.
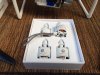
I decided to wire the motors in using fully insulated, crimp on, wire connectors sold by Radio Shack. The advantages of using these quick disconnect power connectors is that no soldering was required and that motors can be easily removed for servicing. If you are interested in using wire connectors for your motors, here's a description of how I did it:
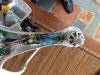
1. Wire connectors are 1/4 inch for 16-14 gauge wire. I got three packs of five male and female connectors through Radio Shack for about $10. The connectors are fully insulated and the part number through Radio Shack is 6403133.
2. The connectors are fairly long to fit the space provided in the arms of the Phantom, so I trimmed off the excess insulation on the connectors where the wire enters the connector.
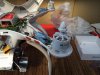
3. First, I cut the wires from the original motors leaving about 1 1/2 inches of wire remaining attached to the original solder points for the motors. After stripping the ends of the three wires leading from the solder points, I crimped on three female connectors.
4. Next, I plugged the male connectors into the three female connectors. After this, I measured the amount of wire needed to be trimmed from the T-Motors to easily reach the male connectors, made my cuts, stripped the ends, and crimped the wires into the male connectors.
5. Since the T-Motors don't use colored wires, special attention to the instructions needs to be made when installing these motors.
I decided to wire the motors in using fully insulated, crimp on, wire connectors sold by Radio Shack. The advantages of using these quick disconnect power connectors is that no soldering was required and that motors can be easily removed for servicing. If you are interested in using wire connectors for your motors, here's a description of how I did it:
1. Wire connectors are 1/4 inch for 16-14 gauge wire. I got three packs of five male and female connectors through Radio Shack for about $10. The connectors are fully insulated and the part number through Radio Shack is 6403133.
2. The connectors are fairly long to fit the space provided in the arms of the Phantom, so I trimmed off the excess insulation on the connectors where the wire enters the connector.
3. First, I cut the wires from the original motors leaving about 1 1/2 inches of wire remaining attached to the original solder points for the motors. After stripping the ends of the three wires leading from the solder points, I crimped on three female connectors.
4. Next, I plugged the male connectors into the three female connectors. After this, I measured the amount of wire needed to be trimmed from the T-Motors to easily reach the male connectors, made my cuts, stripped the ends, and crimped the wires into the male connectors.
5. Since the T-Motors don't use colored wires, special attention to the instructions needs to be made when installing these motors.