
I'm interested in upgrading from the Phantom 3 to Phantom 4 Pro, but only if the still images could be enlarged to about a 36" wide print. I realize low wind, fairly bright conditions, ISO 100 and low apertures will probably give the best results, but can anyone post some of their sharpest stills and give feedback on whether they think you could make a 36" wide print and be very happy with the results? Thanks in advance for your replies.....


You are using an out of date browser. It may not display this or other websites correctly.
You should upgrade or use an alternative browser.
You should upgrade or use an alternative browser.
Still Photo Quality with Phantom 4 Pro
- Thread starter HawkOwl
- Start date
I've printed a ton of photos onto poster board and my parents have them hung up in their house and lake house. The key here is to save the edited file as a TIFF and make sure you have the printer setup properly. My GF works for an advertising company so she has access to the best printers in the world. I sent her the TIFFs and she setup the printers correctly and printed for me. I don't have any pics off hand, but they came out amazing.
The TIFF files are 100+ mb.
The TIFF files are 100+ mb.
- Joined
- Mar 29, 2016
- Messages
- 1,727
- Reaction score
- 504
- Age
- 61
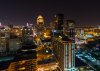
No, there is not more data in a TIFF. A TIFF is not compressed each time it is saved or sent at same size. A J-peg is compressed until it is opened up to it's full size in an app. But as long as you do not make changes as far as tonal contrast or anything else and then save it again it will not lose any quality much at all. Over time they may degrade a tad but not much as long as you are not opening and making changes to it. Some printer may just be set up for a TIFF profile maybe. However,I print 40in INK JET prints on an epson all day long from jpegs and they don't look any diff than a TIFF. TIFFS are a losless type file meaning they are not compressed though. They also store on your computer at their full uncompressed file size too. I would only use TIFFS if I knew the files were going to be edited several times down the road possibly. But you always have a RAW file to start from scratch anyway. And yes, you can def print at least 40in prints from this camera''s files. Even night shots at 100 ISO of brighter cities look incredible taken at 2-5 sec exposures! This camera is pretty awesome! You'll freak when you see the images up against your P3P!!!! Here's a couple from the P4P last weekend.is there more data in a TIFF to make the image better? please explain how TIFF makes enlarging better. Thanks.
Attachments
Last edited:

thanks for the info. KevMo: what are your thoughts on this post: Shooting Stills with ND filters? shutter speed issue?
- Joined
- Mar 29, 2016
- Messages
- 1,727
- Reaction score
- 504
- Age
- 61
Very welcome Carr1976! In pretty bright daylight I use an ND 16 to keep my shutter speed as close to double the frame rate as possible for my video. As it gets closer to dusk that will move to an ND 8 or 4 depending on cloud cover. Then after sun sets I go to the stock UV filter that came with bird for everything as we want all the light coming in we can get to keep our ISO as low as possible. I try to shoot all my stills with this camera at 100 ISO. If it's windy some that's not always possible. I would not go over 800 ISO for stills if possible as they get pretty grainy in the darkks. But this camera and gimble will shoot up to 4-6 second exposures tack sharp if the wind is not blowing much on you. Best aperture for night time is F4 to F8 or so. If you go wider like F2.8 for stills you get light sources glaring a little larger and making it look not quite as sharp as say F5.6 or even more closed. But you have to keep in mind the wind on your stills. If it is blowing 7-12 you might be able to take only up to 1 second exposures or so. That is trial and error getting to know how long you can make your exposures and still be tack sharp without too much movement. Now video in the dark is a diff cookie. You have to up the ISO to 800 and sometimes 1600 to get your video exposed correctly because you cannot slow your shutter down enough to expose correctly at 100 ISO And your video would suck if you could anyway. Because you would have too much motion blur between frames from slower shutter speed for video. Goal is always to try and keep the shutter speed at double the number of your frame rate. So if your shooting in 30fps your shutter should be as close to 60th of a second as possible for so called best Cinematic blur between frames. But in the daylight hours my bird is never without ND filter of some kind to help keep shutter where I want it with an aperture around F4- F5.6 1/2. Daytime settings are usually always 100 ISO @ F4- F5.6 1/2 at a shutter speed of 60th of a second if your shooting at 30fps!thanks for the info. KevMo: what are your thoughts on this post: Shooting Stills with ND filters? shutter speed issue?
No need to use ND filters really on stills unless you want them for effect, such as slow shutter speed shots of water, or close depth of field shots etc.
Video is a different story, twice frame rate for smooth video as mentioned above. There may be times you want polarized ND filters for stills for the normal reasons you would use them.
Video is a different story, twice frame rate for smooth video as mentioned above. There may be times you want polarized ND filters for stills for the normal reasons you would use them.
- Joined
- Mar 29, 2016
- Messages
- 1,727
- Reaction score
- 504
- Age
- 61
So what are you gonna do? Land your bird after you take a video clip to take your ND off real quick and then go back up to your spot and shoot a still with no ND. Don't think that's very feasible! ND is a good idea to leave it on all the time in the daylight hours! The coatings on the glass are better than the stock UV that is on the bird! For night time no filter is a must! But your right Capo! If your gonna shoot some water in a creek thats running and you want to slow your shutter way down to make water blur all together or you are very close to something and you want to blur fast beyond subject with F 2.8 you might need an ND depending on how bright the scene is. So it's really easiest if you just leave one on all the time.No need to use ND filters really on stills unless you want them for effect, such as slow shutter speed shots of water, or close depth of field shots etc.
Video is a different story, twice frame rate for smooth video as mentioned above. There may be times you want polarized ND filters for stills for the normal reasons you would use them.
Last edited:
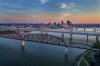
Hey KevMo..... thanks for the input! Is there any way you could size one of your best shots during morning or evening (1 to 2 hours before sunrise/sunset)? It would be killer to see the image sized to 40" then shown here zoomed into 100% from a screen grab. That Louisville bridge pic is awesome but how does it look at 100% zoom? Thanks a ton in advance if you have time to do that. Also, what is the absolute sharpest f stop that you've found for the Phantom 4 Pro camera? I imagine diffraction really creeps in at f8 & smaller apertures. Does f4.5 give you enough depth of field for most aerial shots? (All of above in reference to still shots, not video....)
Last edited:
- Joined
- Mar 29, 2016
- Messages
- 1,727
- Reaction score
- 504
- Age
- 61
Here is a 24x36 at full resolution. So it's a 24x36 @ 124dpi. I have sharpened it a little bit btw. In fact I may have over sharpened a tad. But I just printed this at studio an hour ago and it looks pretty darn good imo.This image has a lot of very fine details in it so it will really show what is actually there as the fine lines are what suffer when resolution is lower. More solid areas do not show much degredation in lower res or softer images.
And yes, around 5.6 or so is the sharpest area for this lens. F4 to 5.6 1/2 or so is fine.
- Joined
- Mar 29, 2016
- Messages
- 1,727
- Reaction score
- 504
- Age
- 61
Oh absolutely dhaymil! You have to nurse these files a little bit for sure. These are small pixels compared to our full frame DSLR'S! So they don't like to be messed with as far as tonal curves much more than one time or so. Anymore and you start degrading the file man! So it's best to get the file as close as you can as far as tonal adjustment before you hit process out of RAW!Nice shot. Anyone wanting to get good images (if new to photo) should ramp up on Lightroom or some other RAW processor - always helpful to so some processing after the fact.
Last edited:
View attachment 84042
Here is a 24x36 at full resolution. So it's a 24x36 @ 124dpi. I have sharpened it a little bit btw. In fact I may have over sharpened a tad. But I just printed this at studio an hour ago and it looks pretty darn good imo.This image has a lot of very fine details in it so it will really show what is actually there as the fine lines are what suffer when resolution is lower. More solid areas do not show much degredation in lower res or softer images.
And yes, around 5.6 or so is the sharpest area for this lens. F4 to 5.6 1/2 or so is fine.
Looks good! Thanks for posting....
Tru dat!
Oh absolutely dhaymil! You have to nurse these files a little bit for sure. These are small pixels compared to our full frame DSLR'S! So they don't like to be messed with as far as tonal curves much more than one time or so. Anymore and you start degrading the file man! So it's best to get the file as close as you can as far as tonal adjustment before you hit process out of RAW!
Love my P4P!
Attachments

- Joined
- Jul 17, 2016
- Messages
- 10
- Reaction score
- 5
- Age
- 76
I don't perform all the F stop and ISO adjustments on my P4. I just set the camera and video settings to AUTO. Oh, and JPEG works just fine.Very welcome Carr1976! In pretty bright daylight I use an ND 16 to keep my shutter speed as close to double the frame rate as possible for my video. As it gets closer to dusk that will move to an ND 8 or 4 depending on cloud cover. Then after sun sets I go to the stock UV filter that came with bird for everything as we want all the light coming in we can get to keep our ISO as low as possible. I try to shoot all my stills with this camera at 100 ISO. If it's windy some that's not always possible. I would not go over 800 ISO for stills if possible as they get pretty grainy in the darkks. But this camera and gimble will shoot up to 4-6 second exposures tack sharp if the wind is not blowing much on you. Best aperture for night time is F4 to F8 or so. If you go wider like F2.8 for stills you get light sources glaring a little larger and making it look not quite as sharp as say F5.6 or even more closed. But you have to keep in mind the wind on your stills. If it is blowing 7-12 you might be able to take only up to 1 second exposures or so. That is trial and error getting to know how long you can make your exposures and still be tack sharp without too much movement. Now video in the dark is a diff cookie. You have to up the ISO to 800 and sometimes 1600 to get your video exposed correctly because you cannot slow your shutter down enough to expose correctly at 100 ISO And your video would suck if you could anyway. Because you would have too much motion blur between frames from slower shutter speed for video. Goal is always to try and keep the shutter speed at double the number of your frame rate. So if your shooting in 30fps your shutter should be as close to 60th of a second as possible for so called best Cinematic blur between frames. But in the daylight hours my bird is never without ND filter of some kind to help keep shutter where I want it with an aperture around F4- F5.6 1/2. Daytime settings are usually always 100 ISO @ F4- F5.6 1/2 at a shutter speed of 60th of a second if your shooting at 30fps!
- Joined
- Mar 29, 2016
- Messages
- 1,727
- Reaction score
- 504
- Age
- 61
Looks good Austin. If your not shooting RAW and then converting to a jpeg your not getting the best quality out of your files. They will be close and fine for internet etc. But if you start making any prints at all you can tell the diff especially if you print fairly large. But it is a big change with some learning on how to set RAW files though. And if your not getting your shutter speed down close to double your frame rate then your video prob doesn't look super cinematic smooth either. I'm not making fun either Austin. Just talking about getting the best possible quality out of these bireds. But your pic looks good man!I don't perform all the F stop and ISO adjustments on my P4. I just set the camera and video settings to AUTO. Oh, and JPEG works just fine.View attachment 84062
Some points to printing highest IQ (image quality) AFAICT:
a. 1" sensor lens is sharpest at f4-f4.5
(wider or narrower, diffraction starts appearing)
(if need larger depth of field DOF, go only up to what's
needed, e.g., f5, f5.6)
b. IQ drops off towards edges of image, even at
very best f-stop, ISO, etc. To what degree depends
on how centered-aligned one's own lens, AFAICT.
Typically, it might be outer 1/5th of image...?
Or it may be more one edge than other edges...?
Know that in advance & leave space around
desired subject matter so IQ drop-off can be cropped...
DOES ANYONE HAVE P4P+ WITHOUT (B) ISSUE???
(IQ OF ENTIRE IMAGE IS CONSISTENT)
- Joined
- Dec 2, 2014
- Messages
- 451
- Reaction score
- 130
I'm interested in upgrading from the Phantom 3 to Phantom 4 Pro, but only if the still images could be enlarged to about a 36" wide print. I realize low wind, fairly bright conditions, ISO 100 and low apertures will probably give the best results, but can anyone post some of their sharpest stills and give feedback on whether they think you could make a 36" wide print and be very happy with the results? Thanks in advance for your replies.....
If you are referring to low apertures, are you talking about low numbers? If so you're defeating the purpose. Higher numbers will give you sharper results
Similar threads
- Replies
- 10
- Views
- 1K
- Replies
- 5
- Views
- 2K
- Replies
- 4
- Views
- 2K
- Replies
- 3
- Views
- 1K


