- Joined
- Oct 19, 2013
- Messages
- 114
- Reaction score
- 38
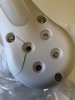
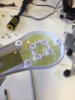
So I decided to check my arms to see if there were any cracks around the motors because I have seen posts the describe this after a few months of flying. I did not think I wild have any because I had removable prop guards and the attached part of the guards would add extra support. We I was wrong, I saw big grace and new cracks starting on another motor. I decided to order a shell online and replace it myself. I have not seen any post on this but I know I did not want to send it to DJI . I just don’t want to deal with them if I don’t have to. Now I feel pretty confident that I will never need to after I completed the task. I also saw a post where someone lined the inside if the motor well with epoxy. I did the same. Not it is very solid and I feel much better about it not just falling out of the sky. Seems like DJI used a different plastic that is not as strong but it also seems that the motor heat up this plastic and cause it to become weak. The new design also points the props outward to reduce prop wash. I think this and the breaking system is a lot of extra tension on the plastic. If you do this, you might want to take photos of every move or do a video so you will remember where it all goes back. I was surprised how easy it was and It back up in the air now and flying great. Here are a few pics.