I have now finished installing my Horizon compact single extreme kit.
Verdict: An absolutely terrifying experience.
I was going to photograph the process, but having ruined a pigtail yesterday trying the solder/splice trick, I thought it might be better to concentrate on the job instead.
Having thought things through, I realised that a soldered splice would create an impedance point, so, I decided to go against Will at Horizon's advice and remove the original RC controller antenna-cable from the board by scraping away the glue. I managed to do it without damaging the connector or the board (whew!). I also managed to source a 180mm pigtail which is an excellent match for 5.8Ghz, as It works out at 5 wavelengths and puts the RP-SMA connector right on the 50 ohm point, excellent.
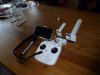
My new pigtail arrived this morning. I checked it with my multimeter and fitted it without incident. Then I dismantled my repeater, checked the pigtails supplied by Horizon and carefully fitted them. Drilling the holes in the side of the repeater was quite nerve-wracking, but I got them in exactly the right place.
Next I fitted the antennae, crossed my fingers and turned on the RC controller. I was relieved to hear the two beeps and get a green light. I turned on the bird and then the repeater and my phone. It all fired up successfully and supplied both telemetry and FPV (Yay!). Next, I checked the RC controller using the RC System Assistant and recalibrated the sticks. I also checked the stick calibration on the bird using the Phantom Assistant. All was well and the IMU didn't need calibrating.
I decided to take her for a test-flight. The weather was perfect this evening; a clear sky and not a breath of wind. Having done my pre-flight checks, I launched the bird from the bottom field and watched her drift lazily away into the blue. I flew her around line-of-sight for a while and then sent her out a bit further. I was running 640 x 480 @ 15 frames per second (without the booster app), and was up at about 350 ft altitude. The FPV started to get slightly glitchy when I got out to around 3000 feet, which, I thought was quite reasonable considering all the power-lines, trees and buildings in the area. I have never had her further out than 1300 feet before, so, I think we can say that the antenna kit has made a substantial difference. I shall try again tomorrow using the booster app.
Verdict: An absolutely terrifying experience.
I was going to photograph the process, but having ruined a pigtail yesterday trying the solder/splice trick, I thought it might be better to concentrate on the job instead.
Having thought things through, I realised that a soldered splice would create an impedance point, so, I decided to go against Will at Horizon's advice and remove the original RC controller antenna-cable from the board by scraping away the glue. I managed to do it without damaging the connector or the board (whew!). I also managed to source a 180mm pigtail which is an excellent match for 5.8Ghz, as It works out at 5 wavelengths and puts the RP-SMA connector right on the 50 ohm point, excellent.
My new pigtail arrived this morning. I checked it with my multimeter and fitted it without incident. Then I dismantled my repeater, checked the pigtails supplied by Horizon and carefully fitted them. Drilling the holes in the side of the repeater was quite nerve-wracking, but I got them in exactly the right place.
Next I fitted the antennae, crossed my fingers and turned on the RC controller. I was relieved to hear the two beeps and get a green light. I turned on the bird and then the repeater and my phone. It all fired up successfully and supplied both telemetry and FPV (Yay!). Next, I checked the RC controller using the RC System Assistant and recalibrated the sticks. I also checked the stick calibration on the bird using the Phantom Assistant. All was well and the IMU didn't need calibrating.
I decided to take her for a test-flight. The weather was perfect this evening; a clear sky and not a breath of wind. Having done my pre-flight checks, I launched the bird from the bottom field and watched her drift lazily away into the blue. I flew her around line-of-sight for a while and then sent her out a bit further. I was running 640 x 480 @ 15 frames per second (without the booster app), and was up at about 350 ft altitude. The FPV started to get slightly glitchy when I got out to around 3000 feet, which, I thought was quite reasonable considering all the power-lines, trees and buildings in the area. I have never had her further out than 1300 feet before, so, I think we can say that the antenna kit has made a substantial difference. I shall try again tomorrow using the booster app.