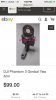
Just finished replacing the Gimbal arm and it wasn't that difficult. First I purchase the Gimbal Yaw arm replacement here:
DJI Phantom 3 Gimbal Yaw Arm. Cost me $119.00 with free shipping but it's made of aircraft grade aluminum (a better alternative than the OEM part).
Next, you carefully remove the camera from the body of the aircraft. (I needed to cut the tops of the holding pins to remove safely (the aircraft came with 2 additional pins and clips so you can throw away the old). The next part of of the repair was a bit tricky but if you've had any experience with building systems, its not too difficult!
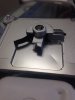
Remove the 5 screws from the back of the Gimbal Yaw Arm. It will expose a small logic board that has two primary connections. You'll need to remove the logic board and the ribbon cables to proceed. Remove the ribbon cables by flipping the black compression fitting upwards at the base of each receiving unit. It's easiest to remove the ribbon cable coming into the side of the unit first and then proceed to the ribbon cable that is fished through the Yaw Arm. Remove the 2nd ribbon cable and set the logic board on a non-static mat.
Now remove the three screws on the back of the Yaw Arm that you exposed when you took the logic board out. Once the three screws have been removed, the bearing assembly will fall off the Yaw Arm. The ribbon cable attached to the Yaw Arm is glued in place with a good adhesive so be careful as you remove the cable from it. There should be enough adhesive left on the cable to re-attach it to the new Yaw Arm. Once you have freed the ribbon cable, you simply need to remove the 2 screws on the back of the mount (making the Yaw Arm base visible) and the 2 screws in the front of the base which will reveal the bearing holding the Yaw Arm in place.
Carefully remove the bent Yaw Arm and replace with the new, making sure you keep the set screw in line with the flat edge of the hub. Don't forget to replace the bearing before re-assembling the base. Assemble the front of the base first and then adjust and tighten the new Yaw Arm at as high on the hub as you can. You'll need to tighten the set screw so the arm rotates freely but allows you to slide the back base cover on.
Next, replace the 3 screw bearing assembly back onto the Yaw Arm carefully threading the ribbon cable back through the new Yaw Arm. Reconnect the ribbon cable (large first and side second) (Make sure to flip back the compression fitting on the ribbon cable!!!!)
Re-assemble the logic board and close the compartment with the cover and 5 screws. (Look carefully at the screws (the top two are larger) Re-attach the ribbon cable to the outside of the new Yaw Arm (should be enough residual to re-attach) making sure you do not have any part of the camera assembly hitting it.
Before re-pinning the base to the Phatom 3 Professional, re-attach the bushings and turn the unit on. It should fire right up and calibrate itself. I ran a full test with the remote before re-pinning the camera unit to make sure all was good.
Took me about 1 hour to complete and it was as good as new when done. Sorry I didn't video it but this step-by-step should work for you too. Good Luck!!


")