P4 Tips to share

FPV FLYING and ZOOM TIP.
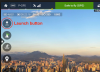
As mentioned at the beginning of this thread the P4 supports a 2X ZOOM function (IOS devices only at this time). When flying with goggles, such as Headplay via HDMI, you can ZOOM with the goggles by pinch and spread on the IOS device while wearing the goggles. Alhough you can't see the IOS screen with the goggles on, it's easy to find the screen with your fingers, enough to simply pinch and spread to ZOOM IN and ZOOM OUT. The view in the goggles will match the IOS screen zoom factor. It's quite handy when exploring cliffs, shoreline, canyons for caves or animals.
 
  • Like
Reactions: Drone Master
INSPIRE RC for P4 flight
Tip #1
You may have seen that some pilots have resorted to using an Inspire RC to control our P4 craft. That's because it's a more powerful RC, providing better range. The problem with the P4 RC is the control signals being transmitted from the RC to the craft are much weaker, it's the weakest Lightbridge RC DJI has manufactured to date. The symptom is reduced control range versus P3P or Inspire craft, often less than a mile in stock form.

The typical behavior we expect from a Phantom craft with Lightbridge is to lose video signal first when you reach the range limit for the area. Most pilots interpret this video drop as the signal to stop flying away from home point, and a signal to increase altitude to get the video signal back. We expect the control signal to still be controlling the craft when video is initially lost, since the video data signal is more difficult signal to communicate. The control signal is tremendously less data to transmit, simpler to transmit, and quicker (lower latency than video, because there is no compression and decompression steps).

With a stock P4 RC you can get total disconnects from the craft at the same time video disconnects in less than a mile range. Many time this "NO SIGNAL" scenario is only for a couple seconds, but sometimes it triggers RTH, which is annoying. This is because of the weaker RF transmission power from the RC to the craft. Many pilots fix this problem with an antenna upgrade, some with amplifiers (extra battery to power those, usually). With an RC upgrade these issues go away to get over 2mi of range, the normal distance we expect when DJI advertises the range is 3mi. Most all P3A/P3P craft sold will easily get a two mile range, but not the P4 unless you mod the RC.

It is possible for an Inspire RC to control a P4 or P3A/P3P craft. The Inspire controller puts out more RF power to the craft for control signal. This helps control the craft when video is lost, and helps you get more range, 2+ miles. NOTE: The Inspire PAF switch works identical to the PSA switch on the P4. It's just mislabeled.

TIP #2..... the downside.
When using an Inspire controller with your P4 craft there are two issues to deal with. #1 You cannot upgrade the P4 craft firmware using an Inspire RC. You'll need to do all upgrades with the original P4 RC. #2, the GO app ABOUT section will not display the version of firmware you have in the craft. Again, you'll need to use the P4 RC to see what version you have. It's not a big deal to go back and forth from one RC to another, linking each one as needed. It's a 1 to 2 minute process after you learn where the option is in the GO app (Tip #4 below).

TIP#3
When you connect your iPad (I'm unsure about Android) to the RC and start the Go app, the software will detect the Inspire RC and automatically show the Inspire craft on the home page. When you link the P4 craft from the camera setup screen, the GO app software auto detects that it's talking to a P4 and reverts to the P4 software in the GO app. Each time you fly and start up the Go app, it will show the Inspire craft on the home page, and when you turn on the P4 craft, it then switches to the P4 version of the s/w, and shows the P4 picture on the home page. This auto detection can be confusing if you don't know what to expect.

TIP #4
To link a P4 to an Inspire RC, both the RC and craft must have the latest firmware, that's the first chore. Then:
1. With the iPad connected to the Inspire RC, Open the GO app and power up the P4 craft
2. Click the RC icon with the two antennas (it's at the top of the camera mode screen)
3. Click the "Remote Controller Settings" option at the top of the page.
4. At the bottom of the Remote Controller Settings page you'll see the link for "Linking Remote Controller".
5. Click that link. It will tick off 60 seconds for you to push the link button on the P4.
6. With a paper clip, push the button in the little hole next to the SD card slot that will be blinking.
7. The Go app will confirm the link to the craft. You're done.
 
  • Like
Reactions: Myetkt
Here's a nice way to organize your SD cards.

DiMeCard micro8 microSD Memory Card Holder - COLOR WAVE EDITION (Ultra thin credit card size holder, writable label) Amazon.com: DiMeCard micro8 microSD Memory Card Holder - COLOR WAVE EDITION (Ultra thin credit card size holder, writable label): Computers & Accessories


UPDATE - Mar 7, 2017:
After using the above device to store micro SD cards, I found it hard to locate sometimes, deep in my backpack. Also, it doesn't hold enough cards. I like using 32GB cards to minimize my risk of flying with too much stored video. Or possibly, a card suddenly getting corrupted, losing everything on the card, so minimizing my storage to 32GB is my preference. It's just a bad idea to have too many flights on one card.

Here's the one I'm using now. I just like it better because it's bigger, hold more cards, and it's more durable.
 
Last edited:
Have not looked for the 2X zoom feature but I will this afternoon. I have the newest version of the DJI Go app and I'm using an iPad mini 4. Does this setting only appear while videoing or is it available for still shots? Thanks for any replies.
 
Have not looked for the 2X zoom feature but I will this afternoon. I have the newest version of the DJI Go app and I'm using an iPad mini 4. Does this setting only appear while videoing or is it available for still shots? Thanks for any replies.
For 1080p video I believe moparherb. Make that your video setting and then pinch the screen i believe
 
I agree with AGreenway on this. If you do the zoom post editing you are able to accurately control the zoom range, speed and position. If you try and do this in-flight you will never be as accurate.
Far better to record as much area as you can and edit it later.

Both is right! Remember that zoom is good when you want it live so to speak. When being out for inspection or survey you might only see the problem or a bird nest when using zoom. W'd only then click the recording button. Without zoom I might miss it in the first place. On the other hand, technically speaking you're better off with keeping the possibilities for post production/editing.
 
PROP MAINTENANCE
I've recently read suggestions to check the little allen head screws that hold the plastic prop twist locks on the motor. I've had my P4 since March 19th and finally check them. All of them were pretty snug, but each of them took about a 1/8 turn to tighten a little more. It's a good idea to check these every 4-6mos just to make sure.

BACKPACK MAINTENANCE
I've bought 4 backpacks for my P3 and P4 craft over the last year. I've bought the Chinese Cheapy, Polar Pro, Pro Craft Treker, and Think Tank Helipak. There is a difference in zipper quality between these backpacks, some are more difficult than others, but one thing I've found that make all plastic zippers work a lot better is graphite. If you buy one of those small tubes of graphite with the small pointy applicator you can carefully apply graphite to the zipper plastic. Then, carefully spread it around on the zipper with a toothbrush. Be careful not to spread too much and get on the backpack material, however it does come off with a clean toothbrush if you're picky like me. Since the backpacks are black you really don't see the graphic if you get any on the material. After applying the graphite the zipper works twice as smooth. Check it out!

As many times as we all unzip and zip our backpacks, this tip is one of the best I've stumbled upon. It's really "slick".
 
Last edited:
HAND LAUNCHING.
As you may know there are times when hand launching makes sense, such as on a boat, on a sandy beach, rough rocks, or high grass areas where the camera does not clear. Eventually you'll be in this kind of situation that needs a hand launch.

Hand launching is easy if you know a few things. First of all, if you're by yourself, you have only one hand to trigger the motor start, since you're holding the craft in the air with the other hand, preferably above your head. There are two ways to start motors, 1. Using the CSC process of pulling both sticks down and to the center. 2. Click the launch icon button on the left side of the GO app screen, then confirm launch buy dragging a slider button to the right. Process #2 is easier with one hand, but you also need a harness to hold your RC, so you can "one hand" the launch commands. The Inspire harness works very nice for $10, but there are others on the market. If you're using a larger display, like an iPad Air2 (like me), the controller can be a little top heavy for the "one handed" launch maneuver, but doable. The iPad Mini's (or any other 8" device) work better, because the RC is less top heavy.

As you slide the bar to the right the motors will start. Before you let it go, push up the left stick to ascend till you hear the motors increase in RPM a little more, then let go of the craft to let it fly away. Practice this in an open field to get use to the process. Then, when you get into situations that require hand launch, you'll be prepared and confident.

upload_2017-3-7_0-14-47.png


upload_2017-3-7_0-16-2.png
 

Attachments

  • upload_2017-3-7_0-13-22.png
    upload_2017-3-7_0-13-22.png
    282.6 KB · Views: 307
Last edited:
HAND CATCHING
Hand catching is often appropriate in certain circumstances, like flying from a boat, or soft sand, rocky terrain, or tall grass. It's advised to practice this capability so you'll be ready and confident when the situation comes up.

Hand catching is easy and safe if you are careful and don't get overconfident, kinda like guns. Just exercise caution and be methodical about the process. Let the craft hover in front of you above head level in P mode. Watch it a few seconds to insure it's stable. TAKE YOUR FINGERS OFF THE RC STICKS and slowly walk over and grab a leg with your RIGHT HAND. When you grab it, hold it there in place. With the RC in your LEFT HAND, push the RC left stick down for 3 seconds with your LEFT THUMB. After the motors turn off, lower the drone down and turn off the battery.

Using an RC harness helps with hand catching, but it's doable without a harness by holding the RC with your left hand against your body to help out with the "one handed" left stick shut down move.
 
MOTOR PROP SPRINGS
The original P4 prop springs look like this below, having 3 sprung fingers to secure the props in the motor clips.
upload_2017-12-17_0-4-36.png


The new style prop spring for the P4P is available for the P4, shown below. The kits cost about $9 for a pair of clip kits, so you need to buy 2 kits for 4 props. These springs are said to provide better security from props coming off with a more solid feel as you install each prop.

21hp-r5d7kL._SL500_AC_SS350_.jpg
 
  • Like
Reactions: Droneboondocker
The new style prop spring for the P4 is a great improvement and very easy to do!
 
MOTOR PROP SPRINGS
The original P4 prop springs look like this below, having 3 sprung fingers to secure the props in the motor clips.
View attachment 92290


The new style prop spring for the P4P is available for the P4, shown below. The kits cost about $9 for a pair of clip kits, so you need to buy 2 kits for 4 props. These springs are said to provide better security from props coming off with a more solid feel as you install each prop.

21hp-r5d7kL._SL500_AC_SS350_.jpg
Yes! I did this mod and it is great and super easy. I don't worry about taking my props on or off anymore. I used to keep them on as much as possible to avoid weakening the springs, now I just take them on and off as I please. Everyone who has the old 3 finger springs should do this!
 

Recent Posts

Members online

Forum statistics

Threads
143,086
Messages
1,467,527
Members
104,965
Latest member
Fimaj