Warning:
The actual process of capturing a shot may seem long-winded to a non-photographer, but to a dedicated photographer it's actually no more long-winded than capturing any other shot when you're doing the job properly. So this is not a solution for snapshotters or for people wanting photos just for web use because the GoPro will give you those.
OK then, here's what I did (and at the end of this construction explanation are the ten steps I use to make it work)
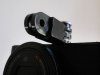
1. Mount for the RX100. I used a thin piece of plastic which was actually an unwanted divider from a tool box. I bored a hole in this to take a small, light tripod screw (sourced on eBay). I used two rubber tap washers to give the thickness required by the tripod screw. I then bored two small holes in two corners through which I threaded some sea fishing line (but anything will do that serves the purpose of making two small, strong loops). So here are images of the mount.


2. Leg extensions for the Phantom. I made two sets of these from 4mm carbon-fibre tubing. One set is 16 cm long and one is 24 mm long. The 24mm ones are for the RX100 solution, I'll tell you about the 16mm ones at the end of this post. OK, the underside of the phantom has four recesses, at the bottom of which are four of the fixing screws that hold the two halves of the shell together. These recesses are 5-6mm in diameter and, if I turn the Phantom upside down the carbon-fibre tubing drops straight into them.

As described in the image, the feet are plastic 'screw hiders' fixed to the legs with bathroom type silicone.


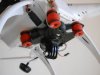
The leg extensions are held tight in place with short lengths of electrician's tape wrapped around the landing gear. The legs take about a minute in total to put in place (and the same to remove) and are easily carried in my Phantom case. Here are the legs in place (they are solid as a rock and very strong as proved by one crash I had):

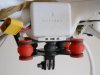
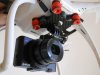
3. At the top of each landing gear leg, I drilled a small hole and made loops in each using small cable-ties. Between the two sets of the latter I fixed a large cable tie and in the centre of that I wrapped two pieces of electrician's tape so as to leave myself a hole in the centre of the tie as per this image:

4. From 1.5 mm electric wire, I made two elongated 'S' hooks and two short ones. The short ones are fixed permanently to the back of the camera mount but are left open on the other end. One end of the two long hooks goes onto the large cable ties mentioned above and the other hooks into two loops of strong fishing line which pass through the camera's wrist-strap lugs. I forgot to point to these in the image below but you can just see a white piece of fishing line looped through the left lug. The knot in the fishing line is sealed with Super-Glue.


As you can see I'm also using the Sony's wrist strap and a very lightweight carabiner. This is my 'security' fixing in case the camera becomes detached.
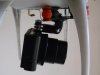
5. To fire the camera I used two hair-ties and a Q-tip with a button fastened in its centre

Here it is fastened to the camera, with the button pressing down on the shutter release.

6. And here is the whole assembly

As pointed out, the angle of the camera is determined by the position of the S-hooks wrapped around the back legs. Once the desired angle of tilt is achieved, I fix the hooks in place by wrapping a piece of electrical tape around them.
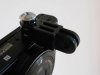
FINALLY, here is the back of my controller and you can see that, on the Zenmuse tilt control, I've marked the GoPro's UP and DOWN points and five points in between.:

So how does it work? Well for me, like any other photo shoot, it's, "Decide on my subject," Decide on my shooting position," Decide on my exposure"....so...
1. Decide on your subject
2. Set the GoPro to 'Narrow' FOV. This will equate to the 28mm angle of view on the RX100
3. Send the Phantom up without the RX100 attached and use the GoPro and FPV to decide the position from where you want to take the shot
4. Look under the controller and note the position of the tilt lever!
5. Land the Phantom
6. Use an exposure meter (if you have one) or use the histogram on the RX100 to decide on the exposure. Set the RX100 to Manual mode and set a shutter speed of a minimum of 1/1000th and whatever aperture is required. *
6. Make sure the RX100 is set to capture RAW + JPEG, that image stabilisation is set to ON, and that manual focus is set at 40 metres**
7. Fix the Q-Tip shutter release in place and attach the RX100 to the Phantom
8. Set the tilt lever to the position you noted and, by eye, set the tilt angle of the RX100 to match the tilt angle of the GoPro and then tape the former in place.
9. Switch on the RX100. The camera will now start taking a photo once every three seconds (apx) and will continue to run until the card is full. On an 8 GB card, this takes about 18 minutes.
10. Fly, go the point where you wanted to take the photo.
Et voila")
* If you use Shutter Priority the camera will determine the exposure for EVERY shot from the FIRST shot it takes and keep it at that. You may not want that to happen!
** The RX100 lens is very good, even at full aperture, therefore there is no need to stop right down. On a normal spring day with sunlight, I can use 1/2000 at f2 without any sharpness problem. Depth of Field is normally not an issue when shooting from a height. I recommend setting manual focus to 40 metres; at 28mm on the RX100, f2 gives a near focus limit of 19 metres and a far focus limit of infinity. If the light is too bright at those settings, then stop down to the point where it is correct and you can still keep your 1/2000 shutter speed.
A great app for Android to enable you to calculate depth of field is 'DOF Calculator' from Cunning Dog Software, available on the Google Play Store. You can set up DOF calculations for three cameras by setting the 'circle of confusion' for each. For the RX100, the circle of confusion is 0.011
If you want a DOF calculator on your PC, I recommend http://www.dofmaster.com
________________________________________
It works. Although the whole rig weighs 1,550 g it flies. I've only had chance to fly it once and it seemed a little 'nose heavy' (but it was very windy at the time). But in any case, it's easy to adjust the centre of gravity and the tilt angles by using longer S-hooks through the camera lugs and/or moving their anchor point on the cable tie forward or back, as desired.
EDIT/UPDATE: see below re the centre of gravity adjustment. After I made these adjustments it flew absolutely perfectly.
So, I am very happy. It may be a bit of a Heath-Robinson solution, but it really does work and, for an expenditure of less then 20 euros, I now have a Phantom that gives me brilliant stills AND brilliant video.
Oh, and video is where the shorter leg extensions come in! I made the 16 cm long ones just to give me some decent ground clearance for the GoPro

Again, they take a very short time to mount and demount and they take up no room in the case.
EDIT: Re finding the centre of gravity.
I hung the complete rig from a hook on the bottom of a tripod (hanging from a piece of string tied centrally, under the Phantom's waist). Using this I got the copper hooks to exactly the right length and position to put the RX100 in the right place as regards centre of gravity for the whole rig. I've found that the front hooks need to be longer and further forward than I've shown above, almost up to the landing gear shoulder. This of course requires the back hooks to be longer too.
The actual process of capturing a shot may seem long-winded to a non-photographer, but to a dedicated photographer it's actually no more long-winded than capturing any other shot when you're doing the job properly. So this is not a solution for snapshotters or for people wanting photos just for web use because the GoPro will give you those.
OK then, here's what I did (and at the end of this construction explanation are the ten steps I use to make it work)
1. Mount for the RX100. I used a thin piece of plastic which was actually an unwanted divider from a tool box. I bored a hole in this to take a small, light tripod screw (sourced on eBay). I used two rubber tap washers to give the thickness required by the tripod screw. I then bored two small holes in two corners through which I threaded some sea fishing line (but anything will do that serves the purpose of making two small, strong loops). So here are images of the mount.
2. Leg extensions for the Phantom. I made two sets of these from 4mm carbon-fibre tubing. One set is 16 cm long and one is 24 mm long. The 24mm ones are for the RX100 solution, I'll tell you about the 16mm ones at the end of this post. OK, the underside of the phantom has four recesses, at the bottom of which are four of the fixing screws that hold the two halves of the shell together. These recesses are 5-6mm in diameter and, if I turn the Phantom upside down the carbon-fibre tubing drops straight into them.
As described in the image, the feet are plastic 'screw hiders' fixed to the legs with bathroom type silicone.
The leg extensions are held tight in place with short lengths of electrician's tape wrapped around the landing gear. The legs take about a minute in total to put in place (and the same to remove) and are easily carried in my Phantom case. Here are the legs in place (they are solid as a rock and very strong as proved by one crash I had):
3. At the top of each landing gear leg, I drilled a small hole and made loops in each using small cable-ties. Between the two sets of the latter I fixed a large cable tie and in the centre of that I wrapped two pieces of electrician's tape so as to leave myself a hole in the centre of the tie as per this image:
4. From 1.5 mm electric wire, I made two elongated 'S' hooks and two short ones. The short ones are fixed permanently to the back of the camera mount but are left open on the other end. One end of the two long hooks goes onto the large cable ties mentioned above and the other hooks into two loops of strong fishing line which pass through the camera's wrist-strap lugs. I forgot to point to these in the image below but you can just see a white piece of fishing line looped through the left lug. The knot in the fishing line is sealed with Super-Glue.
As you can see I'm also using the Sony's wrist strap and a very lightweight carabiner. This is my 'security' fixing in case the camera becomes detached.
5. To fire the camera I used two hair-ties and a Q-tip with a button fastened in its centre
Here it is fastened to the camera, with the button pressing down on the shutter release.
6. And here is the whole assembly
As pointed out, the angle of the camera is determined by the position of the S-hooks wrapped around the back legs. Once the desired angle of tilt is achieved, I fix the hooks in place by wrapping a piece of electrical tape around them.
FINALLY, here is the back of my controller and you can see that, on the Zenmuse tilt control, I've marked the GoPro's UP and DOWN points and five points in between.:
So how does it work? Well for me, like any other photo shoot, it's, "Decide on my subject," Decide on my shooting position," Decide on my exposure"....so...
1. Decide on your subject
2. Set the GoPro to 'Narrow' FOV. This will equate to the 28mm angle of view on the RX100
3. Send the Phantom up without the RX100 attached and use the GoPro and FPV to decide the position from where you want to take the shot
4. Look under the controller and note the position of the tilt lever!
5. Land the Phantom
6. Use an exposure meter (if you have one) or use the histogram on the RX100 to decide on the exposure. Set the RX100 to Manual mode and set a shutter speed of a minimum of 1/1000th and whatever aperture is required. *
6. Make sure the RX100 is set to capture RAW + JPEG, that image stabilisation is set to ON, and that manual focus is set at 40 metres**
7. Fix the Q-Tip shutter release in place and attach the RX100 to the Phantom
8. Set the tilt lever to the position you noted and, by eye, set the tilt angle of the RX100 to match the tilt angle of the GoPro and then tape the former in place.
9. Switch on the RX100. The camera will now start taking a photo once every three seconds (apx) and will continue to run until the card is full. On an 8 GB card, this takes about 18 minutes.
10. Fly, go the point where you wanted to take the photo.
Et voila
* If you use Shutter Priority the camera will determine the exposure for EVERY shot from the FIRST shot it takes and keep it at that. You may not want that to happen!
** The RX100 lens is very good, even at full aperture, therefore there is no need to stop right down. On a normal spring day with sunlight, I can use 1/2000 at f2 without any sharpness problem. Depth of Field is normally not an issue when shooting from a height. I recommend setting manual focus to 40 metres; at 28mm on the RX100, f2 gives a near focus limit of 19 metres and a far focus limit of infinity. If the light is too bright at those settings, then stop down to the point where it is correct and you can still keep your 1/2000 shutter speed.
A great app for Android to enable you to calculate depth of field is 'DOF Calculator' from Cunning Dog Software, available on the Google Play Store. You can set up DOF calculations for three cameras by setting the 'circle of confusion' for each. For the RX100, the circle of confusion is 0.011
If you want a DOF calculator on your PC, I recommend http://www.dofmaster.com
________________________________________
It works. Although the whole rig weighs 1,550 g it flies. I've only had chance to fly it once and it seemed a little 'nose heavy' (but it was very windy at the time). But in any case, it's easy to adjust the centre of gravity and the tilt angles by using longer S-hooks through the camera lugs and/or moving their anchor point on the cable tie forward or back, as desired.
EDIT/UPDATE: see below re the centre of gravity adjustment. After I made these adjustments it flew absolutely perfectly.
So, I am very happy. It may be a bit of a Heath-Robinson solution, but it really does work and, for an expenditure of less then 20 euros, I now have a Phantom that gives me brilliant stills AND brilliant video.
Oh, and video is where the shorter leg extensions come in! I made the 16 cm long ones just to give me some decent ground clearance for the GoPro
Again, they take a very short time to mount and demount and they take up no room in the case.
EDIT: Re finding the centre of gravity.
I hung the complete rig from a hook on the bottom of a tripod (hanging from a piece of string tied centrally, under the Phantom's waist). Using this I got the copper hooks to exactly the right length and position to put the RX100 in the right place as regards centre of gravity for the whole rig. I've found that the front hooks need to be longer and further forward than I've shown above, almost up to the landing gear shoulder. This of course requires the back hooks to be longer too.