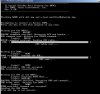
sfh_DM36x.exe -nandflash -v -p "COM8" ubl1.img u-boot.img
-----------------------------------------------------
TI Serial Flasher Host Program for DM36x
(C) 2009, Texas Instruments, Inc.
Ver. 1.50
-----------------------------------------------------
Flashing NAND with ubl1.img and u-boot.img.
Attempting to connect to device COM8...
Press any key to end this program at any time.
Waiting for the DM36x...
Target: BOOTME
BOOTME commmand received. Returning ACK and header...
ACK command sent. Waiting for BEGIN command...
Target: BEGIN
BEGIN commmand received. Sending CRC table...
100% [ ]
CRC table sent....
Waiting for DONE...
Target: DONE
DONE received. Sending the UBL...
100% [ ]
UBL sent....
Target: DONE
DONE received. UBL was accepted.
UBL transmitted successfully.
Waiting for SFT on the DM36x...
Target: Starting UART Boot...
Target: BOOTUBL
BOOTUBL commmand received. Returning CMD and command...
CMD value sent. Waiting for DONE...
Target: DONE
DONE received. Command was accepted.
Sending the UBL image
Waiting for SENDIMG sequence...
Target: SENDIMG
SENDIMG received. Returning ACK and header for image data...
ACK command sent. Waiting for BEGIN command...
Target: BEGIN
BEGIN commmand received.
100% [ ]
Image data sent...
Waiting for DONE...
Target: DONE
DONE received. All bytes of image data received...
Target: Writing UBL to NAND flash
Target: Unprotecting blocks 0x00000001 through 0x00000018.
Target: Number of blocks needed for header and data: 0x0x00000001
Target: Attempting to start in block number 0x0x00000001.
Target: Erasing block 0x00000001 through 0x00000001.
Target: Writing header and image data to Block 0x00000001, Page 0x00000000
Target: Erasing block 0x00000002 through 0x00000002.
Target: Writing header and image data to Block 0x00000002, Page 0x00000000
Target: Erasing block 0x00000003 through 0x00000003.
Target: Writing header and image data to Block 0x00000003, Page 0x00000000
Target: Erasing block 0x00000004 through 0x00000004.
Target: Writing header and image data to Block 0x00000004, Page 0x00000000
Target: Erasing block 0x00000005 through 0x00000005.
Target: Writing header and image data to Block 0x00000005, Page 0x00000000
Target: Erasing block 0x00000006 through 0x00000006.
Target: Writing header and image data to Block 0x00000006, Page 0x00000000
Target: Erasing block 0x00000007 through 0x00000007.
Target: Writing header and image data to Block 0x00000007, Page 0x00000000
Target: Erasing block 0x00000008 through 0x00000008.
Target: Writing header and image data to Block 0x00000008, Page 0x00000000
Target: Erasing block 0x00000009 through 0x00000009.
Target: Writing header and image data to Block 0x00000009, Page 0x00000000
Target: Erasing block 0x0000000A through 0x0000000A.
Target: Writing header and image data to Block 0x0000000A, Page 0x00000000
Target: Erasing block 0x0000000B through 0x0000000B.
Target: Writing header and image data to Block 0x0000000B, Page 0x00000000
Target: Erasing block 0x0000000C through 0x0000000C.
Target: Writing header and image data to Block 0x0000000C, Page 0x00000000
Target: Erasing block 0x0000000D through 0x0000000D.
Target: Writing header and image data to Block 0x0000000D, Page 0x00000000
Target: Erasing block 0x0000000E through 0x0000000E.
Target: Writing header and image data to Block 0x0000000E, Page 0x00000000
Target: Erasing block 0x0000000F through 0x0000000F.
Target: Writing header and image data to Block 0x0000000F, Page 0x00000000
Target: Erasing block 0x00000010 through 0x00000010.
Target: Writing header and image data to Block 0x00000010, Page 0x00000000
Target: Erasing block 0x00000011 through 0x00000011.
Target: Writing header and image data to Block 0x00000011, Page 0x00000000
Target: Erasing block 0x00000012 through 0x00000012.
Target: Writing header and image data to Block 0x00000012, Page 0x00000000
Target: Erasing block 0x00000013 through 0x00000013.
Target: Writing header and image data to Block 0x00000013, Page 0x00000000
Target: Erasing block 0x00000014 through 0x00000014.
Target: Writing header and image data to Block 0x00000014, Page 0x00000000
Target: Erasing block 0x00000015 through 0x00000015.
Target: Writing header and image data to Block 0x00000015, Page 0x00000000
Target: Erasing block 0x00000016 through 0x00000016.
Target: Writing header and image data to Block 0x00000016, Page 0x00000000
Target: Erasing block 0x00000017 through 0x00000017.
Target: Writing header and image data to Block 0x00000017, Page 0x00000000
Target: Erasing block 0x00000018 through 0x00000018.
Target: Writing header and image data to Block 0x00000018, Page 0x00000000
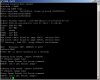
Target: Protecting the entire NAND flash.
Target: DONE
Sending the Application image
Waiting for SENDIMG sequence...
Target: SENDIMG
SENDIMG received. Returning ACK and header for image data...
ACK command sent. Waiting for BEGIN command...
Target: BEGIN
BEGIN commmand received.
100% [ ]
Image data sent...
Waiting for DONE...
Target: DONE
DONE received. All bytes of image data received...
Target: Writing APP to NAND flash
Target: Unprotecting blocks 0x00000019 through 0x00000032.
Target: Number of blocks needed for header and data: 0x0x00000003
Target: Attempting to start in block number 0x0x00000019.
Target: Erasing block 0x00000019 through 0x0000001B.
Target: Writing header and image data to Block 0x00000019, Page 0x00000000
Target: Erasing block 0x0000001C through 0x0000001E.
Target: Writing header and image data to Block 0x0000001C, Page 0x00000000
Target: Erasing block 0x0000001F through 0x00000021.
Target: Writing header and image data to Block 0x0000001F, Page 0x00000000
Target: Erasing block 0x00000022 through 0x00000024.
Target: Writing header and image data to Block 0x00000022, Page 0x00000000
Target: Erasing block 0x00000025 through 0x00000027.
Target: Writing header and image data to Block 0x00000025, Page 0x00000000
Target: Erasing block 0x00000028 through 0x0000002A.
Target: Writing header and image data to Block 0x00000028, Page 0x00000000
Target: Erasing block 0x0000002B through 0x0000002D.
Target: Writing header and image data to Block 0x0000002B, Page 0x00000000
Target: Erasing block 0x0000002E through 0x00000030.
Target: Writing header and image data to Block 0x0000002E, Page 0x00000000
Target: Protecting the entire NAND flash.
Target: DONE
Target: DONE
Operation completed successfully.
This command goes all the way, but even so there is no video yet (black screen) I think this is not the solution, NAND flash in other error