iOSD mini, shopping list..

Colombus said:
Camera Output (Ground and video) that I assume you have currently connected to your vTX, now should go the the iOSD (ground and video in), then ground and video out of iOSD should go to your vTX, replacing the previous connection that you have directly to your camera before.

Check this video for more details:

http://www.youtube.com/watch?v=BrIE-utsthg

Very easy. Not a big deal.

Thanks. Will I need any other cable to plug this in to Fatshark TX? Or will mine fit?
Cheers, Rich
 
I've got my iOSD mini and PMU V2 yesterday afternoon. I've tried to complete the installation yesterday evening after work. I have it nearly completed, I've connected camera to iOSD video in, iOSD video out to vTX, PMU v2 to Naza, GPS to PMU V2, iOSD to PMU V2.

What is giving my some problems is to solder the PMU V2 to the main board at the same point where the battery cable connects. Those soldering point seem to be resistant to my soldering iron. It is not melting down.

Anybody having experience on that, does it have something to do with the power of my soldering iron ,I have one that is 30 W.

Shall I get one with better power?

Something that perhaps should help as well is to change the tip of the soldering iron.

Any advise?
 
Colombus said:
I've got my iOSD mini and PMU V2 yesterday afternoon. I've tried to complete the installation yesterday evening after work. I have it nearly completed, I've connected camera to iOSD video in, iOSD video out to vTX, PMU v2 to Naza, GPS to PMU V2, iOSD to PMU V2.

What is giving my some problems is to solder the PMU V2 to the main board at the same point where the battery cable connects. Those soldering point seem to be resistant to my soldering iron. It is not melting down.

Anybody having experience on that, does it have something to do with the power of my soldering iron ,I have one that is 30 W.

Shall I get one with better power?

Something that perhaps should help as well is to change the tip of the soldering iron.

Any advise?

Just put a little solder on top of the DJI solder points and let it cool. Put some flux on your PMU wire and re-melt your solder. This should secure the PMU wires and you should get a power connection. I actually used an XT60 power plug for my PMU but if I had to do it over again I would have just done a JST connection and soldered that to the DJI power leads.
 
I can report that finally I managed to install iOSD mini.

Installation is not complex but as everybody knows soldering is necessary (as for any OSD option anyway)

I do not have a gimbal and space inside the phantom is already tight but it closes without much effort.

iOSD works well, I managed to test it properly today.

I am very satisfied with the pointing to home location. altitude is pretty accurate.

Though I have an small issue that I am not able to solve so far:

Battery numerical value is showing up properly but once the first and second warning are kicking on, according to the manual the battery icon should flash, but this is not happening.

It is not a big deal but of course since you have the value but it will be nice to have the blinking working properly.

Anybody experiencing something similar.?

M
 
Colombus said:
I can report that finally I managed to install iOSD mini.

Installation is not complex but as everybody knows soldering is necessary (as for any OSD option anyway)

I do not have a gimbal and space inside the phantom is already tight but it closes without much effort.

iOSD works well, I managed to test it properly today.

I am very satisfied with the pointing to home location. altitude is pretty accurate.

Though I have an small issue that I am not able to solve so far:

Battery numerical value is showing up properly but once the first and second warning are kicking on, according to the manual the battery icon should flash, but this is not happening.

It is not a big deal but of course since you have the value but it will be nice to have the blinking working properly.

Anybody experiencing something similar.?

M

M,

I cannot comment as my similar parts are just starting to arrive. I was wondering if the voltage indicated on the iOSD mini is the same as the voltage set in the Naza Assistant for the first warning (red led) when you are looking for the battery icon to flash?
 
Dave Pitman said:
Colombus said:
I can report that finally I managed to install iOSD mini.

Installation is not complex but as everybody knows soldering is necessary (as for any OSD option anyway)

I do not have a gimbal and space inside the phantom is already tight but it closes without much effort.

iOSD works well, I managed to test it properly today.

I am very satisfied with the pointing to home location. altitude is pretty accurate.

Though I have an small issue that I am not able to solve so far:

Battery numerical value is showing up properly but once the first and second warning are kicking on, according to the manual the battery icon should flash, but this is not happening.

It is not a big deal but of course since you have the value but it will be nice to have the blinking working properly.

Anybody experiencing something similar.?

M

M,

I cannot comment as my similar parts are just starting to arrive. I was wondering if the voltage indicated on the iOSD mini is the same as the voltage set in the Naza Assistant for the first warning (red led) when you are looking for the battery icon to flash?

That is exactly what is written on the manual. According to the manual the battery icon should start blinking (with a nearly empty battery) when the first warning is kicking in, and continue blinking until the second warning with a empty battery icon.

Let me know when you complete your installation if this is working properly to you.

Anybody with a similar experience?
 
Colombus said:
Dave Pitman said:
Colombus said:
I can report that finally I managed to install iOSD mini.

Installation is not complex but as everybody knows soldering is necessary (as for any OSD option anyway)

I do not have a gimbal and space inside the phantom is already tight but it closes without much effort.

iOSD works well, I managed to test it properly today.

I am very satisfied with the pointing to home location. altitude is pretty accurate.

Though I have an small issue that I am not able to solve so far:

Battery numerical value is showing up properly but once the first and second warning are kicking on, according to the manual the battery icon should flash, but this is not happening.

It is not a big deal but of course since you have the value but it will be nice to have the blinking working properly.

Anybody experiencing something similar.?

M

M,

I cannot comment as my similar parts are just starting to arrive. I was wondering if the voltage indicated on the iOSD mini is the same as the voltage set in the Naza Assistant for the first warning (red led) when you are looking for the battery icon to flash?

That is exactly what is written on the manual. According to the manual the battery icon should start blinking (with a nearly empty battery) when the first warning is kicking in, and continue blinking until the second warning with a empty battery icon.

Let me know when you complete your installation if this is working properly to you.

Anybody with a similar experience?

No blinking for me. I contacted DJI support but they were useless. I think this is an IOSD V2 feature and that the manual is wrong.
 
Colombus said:
Let me know when you complete your installation if this is working properly to you.

Well, I finally got my iOSD Mini installed and tested. No blinking battery icon when first warning reached. Also, the green led on the unit flashes instead of a steady green. This is also different from the manual. Seems to be working fine.
 

Attachments

  • a.jpg
    a.jpg
    92.5 KB · Views: 637
Thank you Dave for your picture and feedback

This seems to be a defect on the software of the iOSD or at least a discrepancy with the manual.

Now I am quite use to keep an eye on my volt value and usually when it is 11 V I start heading home. This should give me enough time.

I heard another user that was requested by DJI to send the iOSD back due to this issue, I am still waiting for a report if the replaced iOSD is working as described on the manual.
 
Colombus said:
Thank you Dave for your picture and feedback

This seems to be a defect on the software of the iOSD or at least a discrepancy with the manual.

Now I am quite use to keep an eye on my volt value and usually when it is 11 V I start heading home. This should give me enough time.

I heard another user that was requested by DJI to send the iOSD back due to this issue, I am still waiting for a report if the replaced iOSD is working as described on the manual.

There are reports from guys on RC Groups that their iOSD failed when the led started blinking as opposed to a static green light. Mine seems to be working fine, but the led blinks and the manual says it should be static, so I don't know what to think.

Anyway, please post here any new developments or news..

Thanks!
 
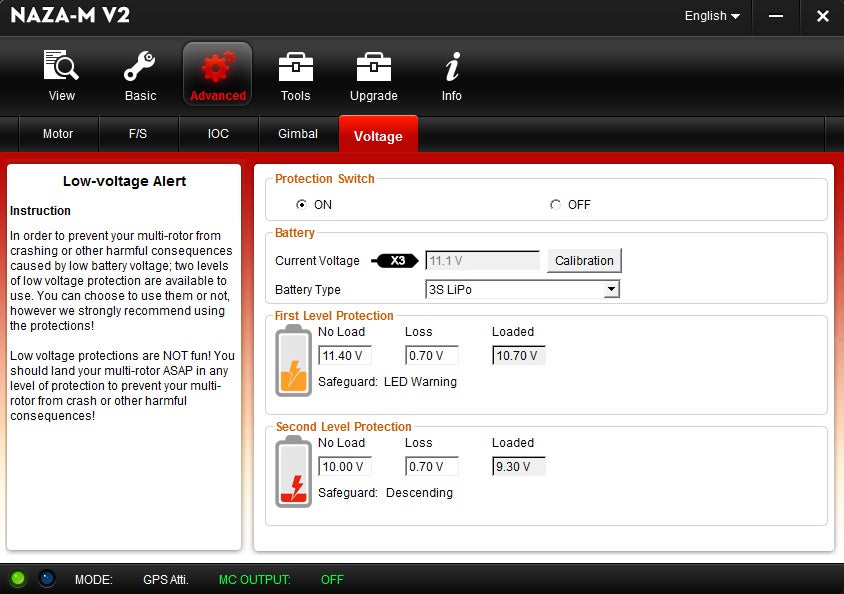
I don't get the flashing battery icon either, one thing to take note of is the voltage shown is the actual voltage and so failsafes will kick in when your voltage gets to what you have set as the loaded value.

If your landing at 11v on the OSD then you probably have an unloaded voltage of 11.6-11.7v

Below is a pic not of my settings but I have mine set at 11.3v first level and 11v second level with .7 load drop. I land at around 10.6v min which will get me unloaded at around 11-11.1v

The guy who's screen is below has basically just disabled level 2 protection with his batt settings and obviously landing not long after level 1 protection but would rather kill a battery then go down where he doesn't want to.

a5841163-200-Asst10.jpg


You will find the faster you fly then the higher the load drop and I have seen up to about .8v with gimbal fpv and 2800mah batt flying full speed. Older batteries will also drop more voltage then newer ones and there is no reason to really fly beyond the 11v unloaded level as that battery dies very quickly once its below 11.1v but that would be around 10.6 loaded.

If your landing at 11v or higher loaded then most likely you aren't seeing first level red flashing even at default settings which I think is about 11.5v with .6 load drop unless flying very slowly where you may only be dropping .4-.5v under load. You will notice that even if you are at 12.6v before motor start its going to be under 12v very soon after takeoff as the voltage drop will get this down.
 
martcerv said:
I don't get the flashing battery icon either, one thing to take note of is the voltage shown is the actual voltage and so failsafes will kick in when your voltage gets to what you have set as the loaded value.

If your landing at 11v on the OSD then you probably have an unloaded voltage of 11.6-11.7v

I have mine set at 11.3v first level and 11v second level with .7 load drop. I land at around 10.6v min which will get me unloaded at around 11-11.1v

I apologize in advance that my lipo understanding is still pretty low.

Is the Current Voltage in the Naza Assitant an under load voltage, or resting voltage? I'm guessing this is the same voltage that is displayed in the iOSD? If I charge the 3S lipo, it is fully charged at 12.6 volts resting. If I pop that in the Phantom and connect it to the Assistant, should it display Current Voltage at 12.6 or some other figure.

As for the warnings, I know that you should not run them down past 11.22v resting (immediately after flight) to comply with the 80% rule, correct? So, to give myself a little wiggle room, what should the warnings be set at.

I know when I get a computerized charger I will get a better handle on this, but now I'm trying to keep track by tapping the balance plug all the time will a cell checker.

I see that you are running your batteries lower, so maybe I know even less than I think, and I think I know pretty little, lol.
 
The voltage in NAZA is the resting voltage unless you are running the motors which I dont think is possible while being connected to the computer. The line loss voltage will be different for most and the default figure is just a basic general safe number they include with the phantom as most people dont look into how to set this properly. Read the info below from here on how to set this up.

Method of Acquiring Line Loss Voltage:

1 Make sure you can fly your multi-rotor normally with a fully charged battery.

2 Use a fully charged battery, switch on the low voltage protections in assistant software, and observe the current voltage. Fill a reasonable warning voltage in the No Load of first protection (We recommend to fill a voltage 1V lower than current voltage and higher than minimum battery voltage rating in). Fill 0V in Loss at the moment.

3 Fly the multi-rotor until the first level protection is triggered, and the red light is flashing. Now land your multi-rotor ASAP.

4 Connect the MC to PC, open the assistant and acquire new current voltage. The Loss (Line loss voltage) is the difference between the new current voltage and the first level No Load voltage you filled in.

http://wiki.dji.com/en/index.php/Naza-M_Voltage_Monitor

For prolonged life of batteries ensuring you stay within the 80 percent rule is a good idea, I do push this a little though not by much trying to come back with 11.1 to 11.2 but have my second level set a little lower just to make sure I can make it back if I went a bit too far.
 
martcerv said:
The voltage in NAZA is the resting voltage unless you are running the motors which I dont think is possible while being connected to the computer. The line loss voltage will be different for most and the default figure is just a basic general safe number they include with the phantom as most people dont look into how to set this properly. Read the info below from here on how to set this up.

Method of Acquiring Line Loss Voltage:

1 Make sure you can fly your multi-rotor normally with a fully charged battery.

2 Use a fully charged battery, switch on the low voltage protections in assistant software, and observe the current voltage. Fill a reasonable warning voltage in the No Load of first protection (We recommend to fill a voltage 1V lower than current voltage and higher than minimum battery voltage rating in). Fill 0V in Loss at the moment.

3 Fly the multi-rotor until the first level protection is triggered, and the red light is flashing. Now land your multi-rotor ASAP.

4 Connect the MC to PC, open the assistant and acquire new current voltage. The Loss (Line loss voltage) is the difference between the new current voltage and the first level No Load voltage you filled in.

http://wiki.dji.com/en/index.php/Naza-M_Voltage_Monitor

For prolonged life of batteries ensuring you stay within the 80 percent rule is a good idea, I do push this a little though not by much trying to come back with 11.1 to 11.2 but have my second level set a little lower just to make sure I can make it back if I went a bit too far.

Thanks, I missed that part of the Wiki.
 
my iOSD also blink, i think this is normal, it means its sending data and my pmu V2 is blinking as well. But what wonders me is that the voltage shown is different then what i get from a amazon lipo checker. Lipo Checker says 11,2V and iOSD says 11,5V, with motors not powerd on. Now who is right ??
 
Daninho said:
my iOSD also blink, i think this is normal, it means its sending data and my pmu V2 is blinking as well. But what wonders me is that the voltage shown is different then what i get from a amazon lipo checker. Lipo Checker says 11,2V and iOSD says 11,5V, with motors not powerd on. Now who is right ??

My PMU also blinks, but nothing is mention about this in the Naza info.

The manual on the iOSD mini says that it should be solid green when in use, and blinking when talking to the assistant software on a pc.

Also, the battery icon should flash when you reach the first voltage warning as set in the Assistant software. If it does not flash, the unit is not working properly.

The voltage shown by the iOSD should match the voltage shown in the Naza Assitant software. If this voltage differs from the voltage checker you are using, you can calibrate (adjust) the voltage in the Naza Assistant software to get it to more closely match you voltage checker.
 
Dave Pitman said:
Daninho said:
my iOSD also blink, i think this is normal, it means its sending data and my pmu V2 is blinking as well. But what wonders me is that the voltage shown is different then what i get from a amazon lipo checker. Lipo Checker says 11,2V and iOSD says 11,5V, with motors not powerd on. Now who is right ??

My PMU also blinks, but nothing is mention about this in the Naza info.

The manual on the iOSD mini says that it should be solid green when in use, and blinking when talking to the assistant software on a pc.

Also, the battery icon should flash when you reach the first voltage warning as set in the Assistant software. If it does not flash, the unit is not working properly.

The voltage shown by the iOSD should match the voltage shown in the Naza Assitant software. If this voltage differs from the voltage checker you are using, you can calibrate (adjust) the voltage in the Naza Assistant software to get it to more closely match you voltage checker.

thanks, it seems that i have to calibrate the voltage in the Naza, its strange that the voltage differs so much but which device should i trust now, the cheap lipo checker from amazon oder the Naza itself? I think i will test the voltage with my battery charger, i hope the charger will not differ as well, then i would have 3 different results.

To the blinking problem, you can update the mini iOSD FW i guess, the software is the same as the bigger iOSD but dont know if that helps. For me its not an issue that the voltage is not blinking when low, i always have an eye on the voltage when flying FPV, maybe you also need the newest naza FW but over all its not a big issue when the voltage not blinks as long as it shows the correct voltage all the time.
 

Recent Posts

Members online

No members online now.

Forum statistics

Threads
143,086
Messages
1,467,525
Members
104,965
Latest member
cokersean20