Gimbal Vertical Problem - How To Fix ?

Joined
Aug 12, 2014
Messages
56
Reaction score
0
Hi...

I have allready fixed my personal P2V+ following this thread

But now i buy a used damaged P2V+ and i have fixed the lights, body shell and other things...

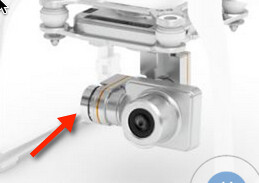
I have caibrated the gimball too, but i do not know how i can fix this last problem on gimbal..

See the video...


[youtube]https://www.youtube.com/watch?v=X4e0nYKhwDw[/youtube]

The gimbal works great, i can see images on APP and control tilt. But the tilt i can't go to most up position because the GREEN bar turn RED and show gimbal obstruction problem, and camera goes down...

As you can see on video, the gimbal try to go up and after he goes down, if i turn the camera for a little low tilt, the gimbal works great...

Anybody know how to fix it ?


Thanks
 
Remove power. Make sure the ribbon cable is not binding. Check the potentiometer and motors for debris. Manually rotate camera and make sure there are no obstructions.

Dont force the camera to check for binding, you dont want to ruin that ribbon cable.
 
Thanks, but all this allready complete...

Now i unmount all the gimbal and wash with with WD-40 and dry with AIR... I will month it again and see is the problem goes away

Because it show like obstruction when it go upright, maybe dirt on the motors.. But i do not know, i will mount it again now and see
 
Without disassembling the Gimbal and doing a continuity test from motherboard to gimbal controller you will be having a difficult time. You have to isolate the issue to diagnose it.

Have you checked the brushless motor resistance values to determine if there is a fault? Did you check the potentiometer for its values?

Spraying it down with wd40 is one thing no one should do. It does nothing but grab dust and debris. It is Water displacement formula 40. That is what it was designed for. Now you have created a path for mineralization to build upon and if it is indeed a detached motor winding it will only get worse. You should use a good electronics cleaner and remove all the wd-40. I repair drones and autonomous craft daily.....
 
I discovered the problem now...

I have made a test and change my vertical tilt gimbal motor from my WORKING ONE to my BAD UNIT and it works

So the problem is the motor or the potenciometer from vertical tilt...

Thanks...

Now i will try to fix the motor or potenciometer.
 
burlbark said:
Without disassembling the Gimbal and doing a continuity test from motherboard to gimbal controller you will be having a difficult time. You have to isolate the issue to diagnose it.

Have you checked the brushless motor resistance values to determine if there is a fault? Did you check the potentiometer for its values?

Spraying it down with wd40 is one thing no one should do. It does nothing but grab dust and debris. It is Water displacement formula 40. That is what it was designed for. Now you have created a path for mineralization to build upon and if it is indeed a detached motor winding it will only get worse. You should use a good electronics cleaner and remove all the wd-40. I repair drones and autonomous craft daily.....


Thanks, but i have used wd-40 because as i brought it damaged, i do not know if the other owner drop it on water or not...

I have find the issue as i said in the last comment, now i will try to fix it...
 
UPDATE...

FIXED..

APPEAR to be dust on the potenciometer, i made a new clean and dry with AIR GUN

Now it is working, for now...

And i can do TILT upright and alldown without problem..
 
GustavL

14729202485_356c12dfaa.jpg


This is the motor that you need to unmount, if you allready try the other fix viewtopic.php?f=27&t=20514 and still not FIXED.

You need to follow there steps:

1 - Unmount the camera back cover removing the 4 screws

2 - Remove the two screws from the METALIC protection that cover the RIBBON CABLE on the left side of the camera

3 - Unplug the FLAT CABLE from camera board, remember to unlock the cable LOCKER, before push the cable

4 - Remove the little screw that hold the camera on the MOTOR SHAFT, you can rotate the camera vertical and you will see the screw on left side

5 - Remove the 3 Screws that hold the motor on place, these screws are located on the same board that i said on step 2

6 - Still a little screw on the other back side of this motor, on the left site, remove it too

7 - Now you need to careful separate the motor POTENCIOMETER motherboard fron the metal that hold motor and unplug the cables from MOTOR and GIMBAL FLAT CABLE ( REMEMBER AGAIN TO unlock the locker, before push the cable )

8 - Remove 3 screws that hold the motor itself and remove the motor from the metal plate.


Just clean the motor and potenciometer mother board with WD-40, and after use an AIR MACHINE to dry it, BE CAREFUL with the air machine POWER, it can damage he pieces.


MOUNT IT AGAIN AND TEST... You do not need to mount the back cover of the camera and metal cover thar cover flat cable to test it. Just the motor and potentiometer board ( AND THE FLAT CABLE, OF COURSE )


DO IT BY YOUR OWN RISKS
 
Hey bond101, thanks a lot for this detailed explanation!

I think other will also benefit.

I did the other fix to level the camera, and that worked 100%.
Tonight I am doing the rest.
 

Recent Posts

Members online

No members online now.

Forum statistics

Threads
143,094
Messages
1,467,590
Members
104,977
Latest member
wkflysaphan4