DNG vs JPEG comparison

Joined
Nov 24, 2013
Messages
371
Reaction score
1
Location
North Bend, WA
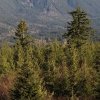
Just updated my camera to 1.1.9, and went out to take some test pictures. Here are some 1:1 pixel zooms - small cropped sections - of similar images taken with DNG and JPEG. For the DNG I did my usual RAW processing workflow - high-pass sharpening in Photoshop, then over to Lightroom for highlight/shadow adjustments and final detail sharpening. The JPEG had no extra processing done to it - beyond what was done automatically in-camera, shot with STD camera sharpening setting.

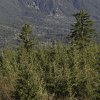
Camera settings for both images: ISO 100, -1 EV, 1/1500 sec. @ f/2.8, Daylight WB

When zoomed like this, you can clearly see the "smeary", impressionistic look to the JPEG due to the lossy compression. More detail in the DNG image. Note that I've done more processing to the DNG here (mostly you'll see the shadow detail is brighter). Further processing on the JPEG image would only degrade image detail further, so I didn't do any.
 

Attachments

  • DJI00003-2-crop.jpg
    DJI00003-2-crop.jpg
    286 KB · Views: 1,205
  • DJI00001-2-crop.jpg
    DJI00001-2-crop.jpg
    370.3 KB · Views: 1,271
Fantastic comparison. Thank you!
I didn't expect the camera in the Phantom to be the most amazing thing in the world. It is so light and small, I figured it wouldn't be that much better than a cellphone camera. Your RAW edits show that the camera does have the potential to output much sharper images than the onboard processor spits out in JPEG format. I can't wait to update the camera and start working with DNGs.

Can you clarify your sharpening process in Photoshop?

Thanks!
 
thebatture said:
Can you clarify your sharpening process in Photoshop?
There are tons of tutorials out there for "high-pass sharpening" in Photoshop if you do a search. Here's one that covers the basics pretty clearly:
http://www.photoshopessentials.com/phot ... high-pass/

I like this technique - it really gives photos some "structure", with a lot more perceived sharpness.
 
jimre said:
thebatture said:
Can you clarify your sharpening process in Photoshop?
There are tons of tutorials out there for "high-pass sharpening" in Photoshop if you do a search. Here's one that covers the basics pretty clearly:
http://www.photoshopessentials.com/phot ... high-pass/

I like this technique - it really gives photos some "structure", with a lot more perceived sharpness.


Thanks! I learned to sharpen RAW output using Unsharp Mask. This process is way more intuitive!!
 
Unsharp Mask and Smart Sharpen are still very useful. I always use the default sharpening in Lightroom (similar to these) as the last step before final output. These final settings will vary, depending on the output size and media.

If you really want to learn sharpening techniques and how they work - I highly recommend this book. This is "The Bible" on image sharpening, written by the guys who actually wrote much of the sharpening code that Adobe uses:
http://www.amazon.com/Sharpening-Photos ... 0321637550
 
As a point of reference for my original post - here's a full-size version of the processed DNG file. Unfortunately, it's been downsized and JPEG-compressed in order to meet this forum's file-size limits. But you can at least see how much of the image you're seeing in the 100% crops above - just the small section in the center with the 2 tallest fir trees sticking up.
 

Attachments

  • DJI00001-2-Edit-2-3.jpg
    DJI00001-2-Edit-2-3.jpg
    493.1 KB · Views: 1,003
jimre said:
As a point of reference for my original post - here's a full-size version of the processed DNG file. Unfortunately, it's been downsized and JPEG-compressed in order to meet this forum's file-size limits. But you can at least see how much of the image you're seeing in the 100% crops above - just the small section in the center with the 2 tallest fir trees sticking up.

Great comparison. Truly helpful. I can definitely see the benefit.
 
jimre said:
As a point of reference for my original post - here's a full-size version of the processed DNG file. Unfortunately, it's been downsized and JPEG-compressed in order to meet this forum's file-size limits. But you can at least see how much of the image you're seeing in the 100% crops above - just the small section in the center with the 2 tallest fir trees sticking up.

Wow what a difference.

Have you used any noise reduction?
 
Klaus said:
Wow what a difference.

Have you used any noise reduction?
I used a little bit of noise reduction on the processed DNG version. Not much needed, since this was shot in bright sunlight at ISO100. But for best results - it's important to do noise reduction *at the same time* you do sharpening, since Sharpening and Noise-Reduction affect each other. That's something you can't really do with the P2V JPEGs. Since the JPEGs are already pre-sharpened in-camera - without any real noise-reduction - the noise is actually being sharpened!
 
jimre said:
Klaus said:
Wow what a difference.

Have you used any noise reduction?
I used a little bit of noise reduction on the processed DNG version. Not much needed, since this was shot in bright sunlight at ISO100. But for best results - it's important to do noise reduction *at the same time* you do sharpening, since Sharpening and Noise-Reduction affect each other. That's something you can't really do with the P2V JPEGs. Since the JPEGs are already pre-sharpened in-camera - without any real noise-reduction - the noise is actually being sharpened!

So noise reduction first just before high pass sharpening? Then I'm assuming color correction, highlights/shadows, maybe brightness/contrast, then final detail sharpening very last?
 
Jre said:
jimre said:
Klaus said:
Wow what a difference.

Have you used any noise reduction?
I used a little bit of noise reduction on the processed DNG version. Not much needed, since this was shot in bright sunlight at ISO100. But for best results - it's important to do noise reduction *at the same time* you do sharpening, since Sharpening and Noise-Reduction affect each other. That's something you can't really do with the P2V JPEGs. Since the JPEGs are already pre-sharpened in-camera - without any real noise-reduction - the noise is actually being sharpened!

So noise reduction first just before high pass sharpening? Then I'm assuming color correction, highlights/shadows, maybe brightness/contrast, then final detail sharpening very last?
The exact order doesn't matter that much - at least with raw processing in Photoshop or Lightroom. I think those apps end up applying all your adjustments in some internal order anyway, before it does a final render/export/save. For High-pass sharpening the order shouldn't matter much either, since it is just sharpening edges - not the broad, solid-color areas where most of the noise lives.

With Lightroom specifically, sharpening and noise reduction are put into the same Details panel for a reason - adjusting one set of sliders affects the other. In Lightroom I always adjust both - back & forth - to get the best balance of details vs. noise.

The worst case is the default JPEGs out of the camera - where the noise actually gets sharpened and then baked-in permanently due to JPEG compression, before you ever get a chance to do any real noise-reduction!
 
Jre said:
So noise reduction first just before high pass sharpening? Then I'm assuming color correction, highlights/shadows, maybe brightness/contrast, then final detail sharpening very last?

I was always taught to sharpen last, after all other adjustments made. Also for print work I tend to sharpen a little more than I would for strictly web/computer work.
 
iResq said:
Jre said:
So noise reduction first just before high pass sharpening? Then I'm assuming color correction, highlights/shadows, maybe brightness/contrast, then final detail sharpening very last?

I was always taught to sharpen last, after all other adjustments made. Also for print work I tend to sharpen a little more than I would for strictly web/computer work.
In general, good advice. If you're doing everything inside Lightroom, the order mostly doesn't matter. Lightroom ends up performing all your adjustments in whatever internal order it deems best, regardless of the order you made them.

If you're making a round-trip into Photoshop for some of the editing - as I often do - then you should definitely do any final Lightroom sharpening after the image is re-imported from PS. And the very last sharpening step - "Output Sharpening" - should be postponed until you know exactly what the final size and media will be. In Lightroom, this is best done on Export where the Output Sharpening dialog lets you pick from Screen, Glossy Paper, Matte Paper, and the amount of sharpening. Lightroom is also smart about optimizing the output sharpening for the media size (eg, 640x480 web image vs. 24" x 36" print, etc).
 
I second jimre's advice wholeheartedly. He has the principles spot on.

I don't use Lightroom but I always sharpen in RAW (pre-sharpening) and then, the very last thing, after all other processing, resizing, etc. has been done comes, as Jre and many others term it, 'Output sharpening'. Actually, I prefer to call it 'Sharpening for purpose'. This is because the amount of sharpening you should apply depends entirely on where the image will end up.

I use a Photoshop plug-in called 'Sharpener-Pro' from Nik software. It's something I'm used to and it's especially useful to be able to apply the sharpening using a brush, especially when working with a model (you want to sharpen the eyes and maybe the hair and lips, but certainly not the skin!)

And finally, if you're sending any prints to a publisher (e.g. for a book or a magazine), don't do any sharpening for purpose at all; they'll take care of that.
 
After some playing around today I am not so depressed as I think it is possible to significantly improve the quality of the photos. Here are two comparisons. The first is the jpeg and second is the raw with de noise, sharpen and a bit of curves and saved as jpeg

http://www.webroutes.co.uk/phantom/photo.html
 
Pull_Up said:
'scuse the ignorance, but can you explain "bit of curves"? :)
In Photoshop, you generally work on your images by adding "adjustment layers" to your image - so that your adjustments are non-destructive and can later be modified or un-done. Adding a "Curves Adjustment Layer" is one of the main ways to adjust exposure and contrast. It's literally a graphed curve, showing relative brightness from the darkest parts of your image to the lightest. You can adjust the curve with your mouse - for example by raising the left side of the curve to make the darkest parts brighter, without affecting the bright parts. A "bit of curves" would mean some fairly small exposure/contrast adjustments.

Of course, it's just one of about a *thousand* different ways to do stuff in Photoshop :)
 
jimre said:
It's literally a graphed curve, showing relative brightness from the darkest parts of your image to the lightest. You can adjust the curve with your mouse - for example by raising the left side of the curve to make the darkest parts brighter, without affecting the bright parts. A "bit of curves" would mean some fairly small exposure/contrast adjustments.

Of course, it's just one of about a *thousand* different ways to do stuff in Photoshop :)
Spot on. To increase contrast, you generally pull the bottom/left of the curve right-wards and the top/right of the curve leftwards, to give a subtle 'S' shape to the line. The more curvy the 'S', the higher the apparent contrast...
 

Recent Posts

Members online

No members online now.

Forum statistics

Threads
143,092
Messages
1,467,577
Members
104,975
Latest member
cgarner1